cauliflower pizza crust

Yes, it’s possible to be gluten-free and paleo and still love your pizza!

Last year I ran across a cauliflower pizza recipe which we tried while my mom in law was in town, and it was a BIG hit! We all loved it, though my only complaint was that it wasn’t sturdy enough to pick up and eat since I chose to leave out the cheese from the crust. But we all dug in with forks and knives, and while it wasn’t the same as the slices of heaven I used to love in NY, it was still a tasty version of pizza. Yay for options!

So here’s the original recipe; you can choose to eliminate the cheese from the crust as we did, but just be warned that it won’t be sturdy enough to pick up.

Note that I substituted goat cheese for mozzarella and instead of hawaiian style I added spinach and prosciutto. Delish!

Oh, and for those of you (like my husband) who don’t love cauliflower, no worries – the cauliflower flavor is undetectable 🙂

Enjoy!


cauliflower pizza crust


(more…)

As a child, I used to make Carrot Cake for holiday desserts; it was my grandpa’s favorite cake and I was always so excited to make him happy with my version which I made by shredding whole carrots, using traditional wheat flour. So when I eliminated gluten and grains from my diet, I intitially thought carrot cake was a part of my past.

But, thanks to some of the many talented chefs sharing their amazing culinary skills online, I’ve run across several versions of carrot cake which I can now try. Love it!

You can view the full ingredients list and recipe for this amazing carrot cake donut here on PaleoOMG’s site. I’m excited to give this one a shot once I can eat coconut flour again, so until I make our own version with some subtle substitutes to allow for my dietary restrictions, I wanted to share the original post with you.

If you do get a chance to make these, please comment below and let me know how they turn out! Also, let me know if you make any substititions that work out well.

Ingredients:

3 large carrots, shredded
1/2 cup sunflower seed butter
4 eggs
3 tablespoons coconut flour
2 tablespoons raw honey
1 tablespoon cinnamon
1 teaspoon vanilla extract
1 teaspoon nutmeg
1/2 teaspoon ginger
1/4 teaspoon cloves
1/2 teaspoon baking soda
1/2 teaspoon baking powder
pinch of salt
1/8 cup chopped walnuts (optional-do not use for nut free version)
1/8 cup raisins (optional) Click here for full recipe....


Live inspired,

Jen

When I started my health journey a few years ago, I discovered kale in large part thanks to my nutritionist. Admittedly, I had never even tried kale, let alone knew why it was such a powerful food.  She explained that I was experiencing oxidative stress, chronic inflammation and various auto-immune conditions that caused my liver to stop functioning properly. Poor liver function lead to an inability to clear my estrogen levels, creating an estrogen-dominant condition which was causing all sorts of health issues.   So she suggested I find ways to enjoy at least one serving of kale daily, which led me to discover kale smoothies, juices and homemade kale chips. 

But before I share one of our favorite kale chip recipes with you, I thought I would cover some of the basics of why kale is such an amazing superfood and perhaps help convince you to enjoy it too!

Kale is an amazing super-green that has been studied in large part for it’s antioxidant-related health benefits, including it’s role in cancer prevention and/or treatment, as well liver clearance and overall general well being. 

Kale for cancer?

Folks in the alternative health sector have promoted natural cancer preventatives for years, and much focus has been placed on the anti-cancer benefit potential of kale. No, I’m not suggesting kale consumption can replace chemo, however, it’s an important component to reducing oxidative stress, which leads to chronic inflammation. Chronic inflammation has many detrimental health effects, including fostering of cancer development and increased cardio/heart stress.

Here’s where we get a bit technical… 

Like most of its fellow cruciferous vegetables, kale has been studied more extensively in relationship to cancer than any other health condition. Kale’s nutrient richness stands out in three particular areas: (1) antioxidant nutrients, (2) anti-inflammatory nutrients, and (3) anti-cancer nutrients (in the form of glucosinolates). Here’s where we get a bit technical: without sufficient intake of antioxidants, our oxygen metabolism can become compromised, and we can experience a metabolic problem called “oxidative stress.” Without sufficient intake of anti-inflammatory nutrients, regulation of our inflammatory system can become compromised, and we can experience chronic inflammation. Oxidative stress and chronic inflammation—and the combination of these metabolic problems—are risk factors for development of cancer. Various research studies have been published on 5 specific types of cancer—including bladder cancer, breast cancer, colon cancer, ovarian cancer, and prostate cancer—and intake of cruciferous vegetables (specifically including kale). As a group, these studies definitely show cancer preventive benefits from kale intake, and in some cases, treatment benefits as well.

Another amazing benefit of kale? The omega-3s in kale are an important part of kale’s anti-inflammatory benefits; it only takes 100 calories of kale to provide us with 25-35% of the National Academy of Sciences’ public health recommendation for the most basic omega-3 fatty acid.

And lastly (at least for this post!) kale has been shown to help aid in both digestion and clearing of the liver, making it an important component to many detox protocols.

Back to the fun stuff!

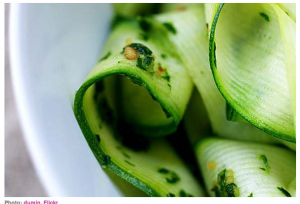
Want to know how to eat a whole head of kale in one sitting (and enjoy it?) Here’s a quick recipe for homemade Kale Chips that take less than 20 minutes to make and are always a big hit with both adults and kids!  I use these as an alternative to potato and corn chips, and keep them on hand for those moments when you crave something a little salty. They travel well, so feel free to make extra and pack them in a ziplock for your trips out anytime you’ll want to dip; salsa, cream dips and hummus all work well with kale chips!


Homemade Kale chips

Homemade Kale chips

Ingredients

  • 1 bunch Kale
  • 1 Tbsp Olive oil or Coconut Oil
  • Salt
  • Pepper
  • Chili Flakes

Instructions

  1. Wash and dry kale leaves.
  2. Cut out center stem from each leaf and discard.
  3. Tear into pieces and put in a bowl.
  4. Toss with seasonings and olive or coconut oil then spread on a greased baking sheet.
  5. Bake at 350°F for 7 minutes, remove from oven and toss.
  6. Then continue baking for 10 minutes or until leaves are crisp.
http://inspiredeats.net/kale-chips/

One of our favorite meals is a quick and easy fish dish; it’s a favorite of my husband and I, and our son loves it too, so we try to serve a healthy fish dish at least once weekly. This blackened catfish is an easy, quick and healthy dish that doesn’t require any prepping ahead of time, and you can swap out catfish for salmon, or any other preferred fish instead. Our son happens to love catfish, salmon, tuna and most white fishes, so we tend to make this with whichever fish is on sale when we’re at the store.

I’ve suggested you can top the fish with a sweet corn salsa, and another option is a fresh mango or similarly sweet salsa. The ingredients aren’t as important as the balance of salty fish with sweet topping, so go for the ones that suit your taste buds the best. Enjoy! 

Blackened Catfish with Asparagus (Paleo, DF, GF)

Prep Time: 10 minutes

Cook Time: 20 minutes

Total Time: 30 minutes

Yield: 2 servings

Blackened Catfish with Asparagus (Paleo, DF, GF)

Ingredients

  • 2 Wild Caught Catfish Filets (with skin)
  • 2-3 TBSP Coconut Oil
  • Cajun-style Seasoning OR
  • 1 Tbsp Paprika
  • 1 Tbsp Cayenne Pepper
  • 1 Tbsp Thyme
  • 1 Tbsp Oregano
  • 1 Tbsp Sea Salt
  • 1 Tbsp Black Pepper
  • Fresh Asparagus
  • Olive or Coconut Oil for drizzling on Asparagus
  • Salt & Pepper to taste

Instructions

  1. Wash asparagus and remove stems.
  2. Line a pan with aluminum foil and layer asparagus on top, in one layer.
  3. Drizzle with coconut or olive oil and generously sprinkle S&P.
  4. You can also squeeze fresh lemon or lime on top of the asparagus if desired.
  5. Place in oven on 300 degrees for 10 minutes.
  6. In the meantime, mix all spices together and spread out on a plate.
  7. Rub the flesh side of the catfish with a little olive oil and press the catfish (flesh side down) onto the spices.
  8. Heat 2-3 Tbsp of Coconut oil in a pan over medium heat.
  9. Once it is hot (or smoking), turn off the burner.
  10. Place the catfish flesh side down in the pan, on one layer, so they both have contact with the pan. Turn the heat back on medium and cook for 2 minutes.
  11. After 2 minutes, turn the heat down to medium-low and flip catfish over.
  12. The spiced, flesh side should be crispy.
  13. Cook at medium-low for another 3-5 minutes (skin should be crispy at this point).
  14. Remove asparagus from oven and cut spears in half.
  15. Serve immediately.
  16. Optional: sweet corn salsa - if desired you can top fish with a sweet corn salsa made of fresh corn and some cilantro.
http://inspiredeats.net/blackened-catfish-with-asparagus-paleo-df-gf/


Here’s a quick recipe that you can make with ingredients we tend to have lying around the house – thanks to our garden and fresh farm deliveries! 

This doesn’t require a crock pot/slow cooker, but the beef and veggies are tender and delish. Whip this up in less than 30 minutes and have a tasty and satisfying meal for the family.

Enjoy! 

Paleo Asparagus, Mushroom & Beef

Prep Time: 10 minutes

Cook Time: 15 minutes

Total Time: 25 minutes

Yield: 2 servings

Paleo Asparagus, Mushroom & Beef

Ingredients

  • 1 lb Beef
  • 1 Red Bell Pepper
  • 16 Asparagus Spears
  • 6 Mushrooms (Baby Portobello preferred)
  • Adobo Seasoning (for dusting the beef)
  • 1 Tbsp Coconut Vinegar
  • ½ cup GF Chicken Stock
  • 2 Garlic cloves
  • 2 Tbsp Agave or honey
  • 2 Tbsp Olive Oil or Fat of Choice
  • ½ cup Coconut Aminos (or GF Wheat-free Tamari)
  • Green Onions
  • Salt and Pepper (to taste)
  • *Optional: 1 Tbsp Arrowroot + 3 Tbsp Water

Instructions

  1. Slice the beef into ¼” strips
  2. Dust with adobo seasoning and vinegar (optional) and set aside
  3. Cut the asparagus into 1 1/2” pieces, slice the mushrooms to ¼” thick and the pepper to 1” pieces
  4. Toss in sea salt and pepper and set aside
  5. Combine the chicken stock, garlic, honey, coconut aminos and arrowroot (use to thicken sauce) and water
  6. Blend and set aside
  7. Heat the oil over medium-high heat in a large pan or wok
  8. Once hot, add the pork. Cook until almost no longer pink
  9. Add the vegetables to the pork
  10. Cover and cook for about 2 minutes, then add the sauce
  11. Stir to coat and cook until the asparagus is done (about 2 more minutes covered)
  12. Garnish with green onions and enjoy!
http://inspiredeats.net/paleoasparagusbeef/

Pizza nights are back!

Danielle of Against All Grain has done it again!

This time she has come up with a grain free pizza crust that claims to be delicious, and to hold up against its gluten and grain-full competitors, unlike some of the other grain free crusts we’ve tried which don’t allow you to pick up and indulge in a little slice of pizza heaven. 

She tops her with some of the delicious and healthy meats from US Wellness Meats, though we left the toppings up to you on this one, so go ahead and indulge in your favorites. Some of ours include goat cheese, spinach, garlic and tomatoes.  Another fave is sauce, ham and pineapple.  And yet another is the meat lovers favorite with proscioutto, sausage, ground beef and jalapeno. 

Truth be told, top it with whatever fresh and delish toppings you want and simply enjoy the ability of savoring pizza again on a grain free diet! 


Paleo, Gluten Free Pizza Crust

Prep Time: 20 minutes

Cook Time: 25 minutes

Total Time: 45 minutes

Paleo, Gluten Free Pizza Crust

Ingredients

    INGREDIENTS - CRUST
  • 3/4 cup whole raw cashews (or 1 cup cashew flour)
  • 3 tablespoons almond flour
  • 1/4 cup coconut flour
  • 1/2 teaspoon baking soda
  • 1/2 teaspoon salt
  • 1/8 teaspoon garlic granules
  • 2 eggs
  • 2 tablespoon almond milk
  • 1/2 teaspoon apple cider vinegar
  • 2 1/2 tablespoons extra-virgin olive oil
  • 1 tablespoon cold water
  • 1 tablespoon fresh parsley
  • 2 tablespoons fresh basil
  • INGREDIENTS - PIZZA
  • 1/2 cup marinara sauce
  • 3/4 cup US Wellness Meats Raw Mozzarella Cheese, shredded
  • 1/4 USWM Salami, casing removed and thinly sliced
  • 1 USWM Italian Sausage, casing removed and pre-cooked
  • 2 pieces USWM sugar-free bacon, cooked and chopped
  • 1/4 cup mushrooms
  • 1/4 cup black olives, pitted and sliced

Instructions

  1. Preheat oven to 350 degrees.
  2. In a food processor, pulse the cashews until a fine flour has formed.
  3. Add in the almond flour, coconut flour, baking soda, salt, and garlic granules, then process the mixture for 1 minute.
  4. Add the eggs, almond milk, apple cider vinegar, olive oil, and water and process for another minute. Scrape down the sides of the bowl and pulse a few more times until you have a very smooth dough.
  5. Add the parsley and basil, and pulse two more times to roughly chop and incorporate the herbs.
  6. Let the dough rest for 2 minutes to let the coconut flour absorb some of the liquid.
  7. Sprinkle a piece of parchment paper with a little almond flour, then turn the dough out onto the counter. Sprinkle a little more flour on the top of the ball of dough, then place another piece of parchment on top.
  8. Use your hands to flatten the ball into a disc, then lightly roll out the dough into a circle that is 1/4 inch thick.
  9. Remove the top piece of parchment and carefully slide the other piece with the crust onto a pizza pan.
  10. Bake the crust for 12 minutes, or until it has puffed up and is golden brown around the edges.
  11. Top with sauce and your favorite toppings and bake for another 10-15 minutes.
  12. Enjoy!
http://inspiredeats.net/paleo-gluten-free-pizza-crust/


As many of you following a paleo diet can relate to (and as this Italian-raised girl often blogs about) the old pasta dish is one of the most commonly missed dishes in my home. I grew up on homemade pasta dishes covered in homemade sauces, used as a base for lasagna and nestled in between fresh mozz and ricotta cheeses as a baked ziti.  So when I found out I had to give up pasta, I felt sad and a bit scared; scared of never enjoying my old favorites again. 

And it didn’t take long for me to hop online searching for an alternative pasta once I went paleo and kicked out all grains for good. Soon I discovered many posts about “zuchinni pasta”.  Sliced lengthwise, about one-eighth-inch thick (which you can also do it with a sharp knife, but it’s easier with a mandoline), zucchini ribbons can stand in for regular pasta. (Steam them for a couple of minutes until they’re crisp-tender.)

So when we ran across this paleo, dairy free ‘pasta’ dish on All Against the Grain, we were so excited to give it a test as it meets not only our gluten free, but our paleo needs too. And as Danielle who writes All Against the Grain often does, she was inspired by a similar recipe she found online and tweaked it a bit for her own tastes. 

The version we made at home was slightly different, so you can read her original post here and below for our modified version. 

This tasty little treat is not only grain free, but it’s dairy free as well, and with a quick omission of the prosciutto, it’s vegan friendly too. How perfectly balanced is that?  Food and health in harmony; life is good 🙂


Paleo zucchini “pasta”

Prep Time: 15 minutes

Cook Time: 15 minutes

Total Time: 30 minutes

Yield: 4 servings

Serving Size: 1 plate

Paleo zucchini “pasta”

Ingredients

  • 4 medium zucchini, peeled and sliced into thin noodles
  • 1 cup asparagus pieces
  • 2 tablespoons virgin olive oil
  • 1/2 cup cherry tomatoes, cut in half
  • 1 cup fresh chopped mushrooms
  • 4 cups boiling water
  • 1 garlic clove
  • 2 tablespoons chopped basil
  • 1/4 teaspoon salt
  • dash of pepper
  • Garnish with toasted pine nuts and fresh basil

Instructions

  1. Steam or pre-boil the zucchini slices until they're slightly tender (about 3-4 minutes)
  2. Heat olive oil in a nonstick pan
  3. Mince cloves of garlic and add zucchini, asparagus and mushrooms together over medium heat until the zucchini softens but isn't mushy.
  4. Add tomatoes and remove from heat.
  5. Garnish with toasted pine nuts and fresh basil.

Notes

Alternate options include:

2 ounces prosciutto (omit for vegan and add 1/4 teaspoon salt) 1/2 cup frozen peas (omit if you’d like for Paleo)

http://inspiredeats.net/dairy-and-grain-free-creamy-pesto-pasta-with-spring-vegetables/
Paleo creamy pesto zucchini “pasta”


Sweet, salty, creamy and crunchy. Too good to pass up!

I’ve mentioned how much I like this site, Against All Grain, in the past so today I’m showcasing another of her fab recipes which is perfect for summer! As someone who eats a lot of salads, I can tell you I’m excited to give this one a shot.  The idea of combining the sweet and gritty texture of watermelon with arugula and goat cheese is just too tasty to imagine. So while I head out to the store to grab some watermelon, I wanted to throw this recipe up so you can enjoy it in the meantime. 


watermelon salad with arugula, goat cheese & candied walnuts

Yield: 6 servings

Serving Size: 1 individual salad

watermelon salad with arugula, goat cheese & candied walnuts

Ingredients

  • 6 pieces of watermelon, cut to 1 inch thickness
  • 2 cups baby arugula
  • 2 tablespoons fresh mint, chopped
  • 2 teaspoons extra virgin olive oil
  • 1 teaspoon fresh lemon juice
  • pinch of salt and pepper
  • 1/4 cup crumbled goat cheese (omit Goat Cheese or sub in Vegan cheese for vegan options)
  • 1 teaspoon balsamic vinegar
  • 1/2 cup Spiced Candied Walnuts, roughly chopped

Instructions

  1. Using a large biscuit cutter, or just great circle cutting knife skills!, cut the watermelon slices into round circles. Use a knife to trim off any parts that make the circle uneven so it sits flat on a plate.
  2. In a medium bowl, toss the arugula with the mint, olive oil, lemon juice, salt, and pepper.
  3. Arrange the watermelon circles on a plate, then top each with a small handful of the arugula mixture (roughly 1/3 cup each).
  4. Sprinkle each salad with goat cheese and the chopped walnuts, then drizzle the balsamic vinegar over the tops.
  5. Enjoy!

Notes

* If you’re serving to a larger crowd, or don’t want to take the time to cut the watermelon into rounds, you can use a melon baller to create cute balls or just simply cut the watermelon into chunks and pile it all into a salad bowl.

http://inspiredeats.net/watermelon-salad-with-arugula-goat-cheese-candied-walnuts/


I don’t know about you, but one of the things I tend to crave when the cravings hit (and I should mention that they don’t come very often when you follow the paleo diet) is chocolate. So I was so happy to run across this tasty, guilt free treat to help satisfy those cravings when they hit!

I was browsing some of my fave sites today and ran across a new one so I can’t yet vouch for these, but they look delish and after reading a bit about the site’s owners and browsing their other recipes, I’m pretty excited to give this one a shot! Note that you can make them vegan by using dairy-free dark chocolate – yum!

Head on over to their site and view the orignal recipe here; http://www.neverhomemaker.com/2010/06/frozen-banana-bites.html 

Enjoy!!


Frozen chocolate peanut butter banana bites

Prep Time: 10 minutes

Cook Time: 5 minutes

Total Time: 15 minutes

Ingredients

  • 2 large bananas
  • 1/4 to 1/3 cup vegan chocolate chips
  • 1/4 to 1/3 cup natural peanut butter
  • Unsweetened coconut flakes

Instructions

  1. Set out a large plate or bowl with a piece of parchment or wax paper on it.
  2. Cut up the bananas into good-sized chunks. Each banana should give you around 5 to 6 pieces.
  3. Heat the peanut butter and chocolate chips in the microwave on high for about a minute. Then stir until smooth.
  4. Dip the banana pieces in the chocolate-peanut butter mixture. Lay them out leaving some space between them on the parchment/wax paper. Then when you've "covered" them all, use the remaining mixture to spoon over the tops (for even more chocolate-y goodness).
  5. Then sprinkle the unsweetened coconut flakes on top. Transfer to the freezer for about an hour until hardened.

Notes

You can enjoy them right after they're made (but they aren't frozen yet -- and when they're frozen, the banana tastes like vanilla ice cream). I suggest then covering with some plastic wrap (or really you can do all of this in some kind of Rubbermaid container) and let them freeze overnight.

http://inspiredeats.net/frozen-chocolate-banana-bites-vegan/


I just discovered a new vegan foodie blog today and found this delish looking recipe for gluten free, vegan waffles. When you get a chance, hop over to visit An Unrefined Vegan, described as Unprocessed, unbleached and cruelty-free:  low-fat, low-sugar, whole food and plant-based recipes to nurture body, brain and conscience. Her food choices are creative, sound incredible and I love her photos! Great blog to bookmark 🙂

I’m sure it would taste just as good with traditional eggs and buttermilk for the non vegans here, so go ahead and experiment a bit and tell me how it turns out!

Gluten free, vegan: Banana-Chai Buttermilk Waffles with Cocoa-Coconut Butter

Prep Time: 10 minutes

Cook Time: 10 minutes

Total Time: 20 minutes

Yield: 3+ 8" waffles

Serving Size: 1 8

Ingredients

  • 1 cup spelt flour (use gluten-free flour or flour substitute such as almond flour for gluten free version)
  • 1/3 cup oat flour (use certified gluten free oats and process them in a food processor)
  • 1/2 cup almond meal (I used the meal left over from making almond milk, dried and processed in food processor)
  • 1 1/2 tsp. baking powder
  • 1/2 tsp. salt
  • 1/4 tsp. baking soda
  • 1/4 tsp. powdered stevia
  • 1/4 tsp. anise seeds (ground in coffee grinder)
  • 1/4 tsp. powdered cardamom
  • 2 pinches ground black pepper
  • 1/4 tsp. ground cinnamon
  • 1/8 tsp. ground cloves
  • 1/4 tsp ground ginger
  • 2 tbsp. egg replacer + 6 tbsp. water (whisk together until frothy, then let sit for a minute)
  • 1 large, very ripe banana, mashed
  • 1 1/2 cups vegan buttermilk
  • 1 tsp. vanilla extract

Instructions

  1. Combine the flours, almond meal, baking powder, salt, baking soda, stevia and spices in a large bowl.
  2. In a smaller bowl, whisk together the egg replacer, banana, buttermilk and vanilla extract. Add the wet ingredients to the dry ingredients and stir just until the dry ingredients are just moistened. Let the batter sit for about 15 minutes. (Turn the oven on to 200F so you can warm the plates and keep the cooked waffles crispy – and heat up the waffle iron, too.)
  3. Lightly spray waffle iron with cooking oil and ladle on the batter. Cook for about 4-5 minutes and gently remove waffle and place on oven rack to keep warm while you prepare the rest of the waffles.
  4. Top with a dab, slab or slice of Cocoa-Coconut Butter and your other favorite waffle toppings!
http://inspiredeats.net/gluten-free-vegan-banana-chai-buttermilk-waffles-with-cocoa-coconut-butter/


Cocoa-Coconut Butter

Ingredients

  • Cocoa-Coconut Butter
  • 1/4 cup + 2 tsp. soy milk
  • 1 tsp. apple cider vinegar
  • 1/8-1/4 tsp. salt
  • 2 1/4 tsp. soy lecithin granules
  • 1/4 tsp. xanthan gum
  • 1/2 tbsp. unsweetened cocoa powder
  • 3 tsp. agave nectar
  • 1/4 tsp. vanilla extract
  • 1/2 cup + 2 tbsp. + 1 tsp. refined coconut oil
  • 1 tbsp. canola or vegetable oil

Instructions

  1. In a small measuring cup, whisk together the soy milk and cocoa powder until thoroughly combined. Whisk in the salt and apple cider vinegar and let sit for 10 minutes.
  2. Melt the coconut oil in a small measuring cup. It’s not necessary to completely melt it down – some small solid bits are okay. In the bowl of a food processor, add the melted coconut oil, canola oil, soy milk mixture, soy lecithin granules, xanthan gum, agave nectar and vanilla extract.
  3. Process for 1 minute, then scrap down the sides and bottom – sometimes the soy lecithin granules get stuck near the blade. Process for an additional minute, then carefully pour the mixture into the molds.
  4. Chill in the freezer for at least one hour before removing from molds. Store in the refrigerator or freezer.
http://inspiredeats.net/gluten-free-vegan-banana-chai-buttermilk-waffles-with-cocoa-coconut-butter/


Are you gluten-free, but still want to enjoy some of the sinfully delicious recipes you were used to, such as P.F Chang’s Mongolian Beef?  Well now you can! Here’s a recipe for PF Chang’s Mongolian Beef (one of my hubby’s faves) as prepared gluten free. 

Note the nutritional content on the recipe below and keep in mind this is a splurge/indulgence 🙂 

Enjoy!


P.f. Chang’s Mongolian Beef (Gluten Free)

Prep Time: 30 minutes

Cook Time: 30 minutes

Yield: 2

Serving Size: 1 (492 g)

Calories per serving: 848.2

Fat per serving: 23.4

Ingredients

  • 2 teaspoons vegetable oil
  • 1/2 teaspoon ginger , minced
  • 1 tablespoon garlic , chopped
  • 1/2 cup tamari soy sauce (aka gluten-free soy sauce. DO NOT use regular soy sauce)
  • 1/2 cup water
  • 3/4 cup dark brown sugar
  • vegetable oil , for frying (about 1 cup)
  • 1 lb flank steak
  • 1/4 cup cornstarch (verify it has no wheat or wheat flour)
  • 2 large green onions

Instructions

  1. Make the sauce by heating 2 tsp of vegetable oil in a medium saucepan over med/low heat.
  2. Don't get the oil too hot.
  3. Add ginger and garlic to the pan and quickly add the soy sauce and water before the garlic scorches.
  4. Dissolve the brown sugar in the sauce, then raise the heat to about medium and boil the sauce for 2-3 minutes or until the sauce thickens.
  5. Remove it from the heat.
  6. Slice the flank steak against the grain into 1/4" thick bite-size slices.
  7. Tilt the blade of your knife at about a forty five degree angle to the top of the steak so that you get wider cuts.
  8. Dip the steak pieces into the cornstarch to apply a very thin dusting to both sides of each piece of beef.
  9. Let the beef sit for about 10 minutes so that the cornstarch sticks.
  10. As the beef sits, heat up one cup of oil in a wok (you may also use a skillet for this step as long as the beef will be mostly covered with oil).
  11. Heat the oil over medium heat until it's nice and hot, but not smoking.
  12. Add the beef to the oil and sauté for just two minutes, or until the beef just begins to darken on the edges.
  13. You don't need a thorough cooking here since the beef is going to go back on the heat later.
  14. Stir the meat around a little so that it cooks evenly.
  15. After a couple minutes, use a large slotted spoon to take the meat out and onto paper towels, then pour the oil out of the wok or skillet.
  16. Put the pan back over the heat, dump the meat back into it and simmer for one minute.
  17. Add the sauce, cook for one minute while stirring, then add all the green onions.
  18. Cook for one more minute, then remove the beef and onions with tongs or a slotted spoon to a serving plate.
  19. Leave the excess sauce behind in the pan.

Notes

Amount Per Serving % Daily Value Calories 848.2 Calories from Fat 211 24% Total Fat 23.4 g 36% Saturated Fat 8.4 g 42% Cholesterol 154.2 mg 51% Sodium 4255.9 mg 177% Total Carbohydrate 103.1 g 34% Dietary Fiber 1.5 g 6% Sugars 81.9 g 327% Protein 56.7 g 113

http://inspiredeats.net/p-f-changs-mongolian-beef-gluten-free/

Easy breezy, this brisket recipe is a no-brainer for an easy and delish dinner option.

With the use of Braggs Aminos, its not only paleo but gluten-free friendly too! So grab the crockpot, set it on simmer and come home to a house filled with the amazing aroma of brisket.  We enjoy this with mashed cauliflower, but asparagus, broccoli or any other fave veggie are great as well. 


(more…)