Paleo Chicken Meatballs

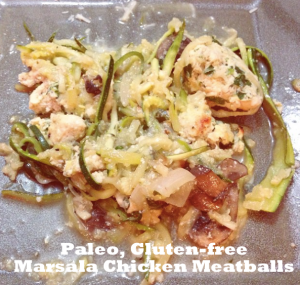
If you want to wow your friends and family with a dish packed with intense flavor and free of allergens, then you have to try this!  It falls into our 30 minutes or less group, making it truly one of our favorite go-tos for a healthy, quick and super satisfying meal. We have replaced all flour, gluten and dairy with allergen-free ingredients, and use zucchini noodles in place of pasta, so this healthy dish is gluten-free, dairy-free, soy-free and Paleo. Score!

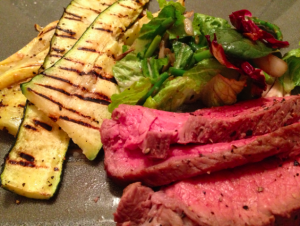
If you haven’t cooked with zucchini noodles yet, the main thing to watch for is not over cooking the “noodles”, so we toss the ribbons in at the last 5 minutes with this recipe so they have just enough time to soften up, but won’t lose their coarse texture that’s reminiscent of pasta. The easiest way to prep the zucchini noodles is with a mandolin or spiralizer (both will link to the ones we bought on Amazon). The mandolin is simple to use, once you get used to it, but just be careful to avoid the sharp blade, and definitely don’t let your kiddos use this one! If you prefer a spiralizer, this is our favorite! Sometimes I can be a big baby about the mandolin and want to use something easy, without sharp edge to worry about cutting myself on.

I can’t wait to hear what you think about this recipe, so please share your comments below!

Gluten-free, Paleo Marsala Chicken Meatballs

Cook Time: 30 minutes

Yield: 4-5 servings

Ingredients

  • 1/4 cup almond flour
  • 2 tablespoons coconut milk, room temperature
  • 1/3 cup plus 1 tablespoon Marsala wine
  • 1 lb ground white meat chicken
  • 1/4 cup grated manchego, plus extra for serving
  • 1 large egg, beaten
  • 2 tablespoons chopped fresh parsley
  • 1 teaspoon kosher salt
  • 1/8 teaspoon freshly ground black pepper
  • 2 tablespoon extra-virgin olive oil
  • 8 ounces cremini mushrooms, sliced
  • 1 large onion, minced
  • 1 1/2 teaspoons almond flour
  • 1 1/4 cups low-sodium chicken broth
  • 4 large zucchinis, cut into noodles

Instructions

  1. Preheat the broiler to high.
  2. In a large bowl, mix together 1/4 cup almond flour, coconut milk and 1 tablespoon marsala.
  3. Let soak for 5 minutes.
  4. Add the chicken, manchego, egg, parsley, 1/2 teaspoon of the salt and the pepper.
  5. With your hands, gently mix together the ingredients until just combined.
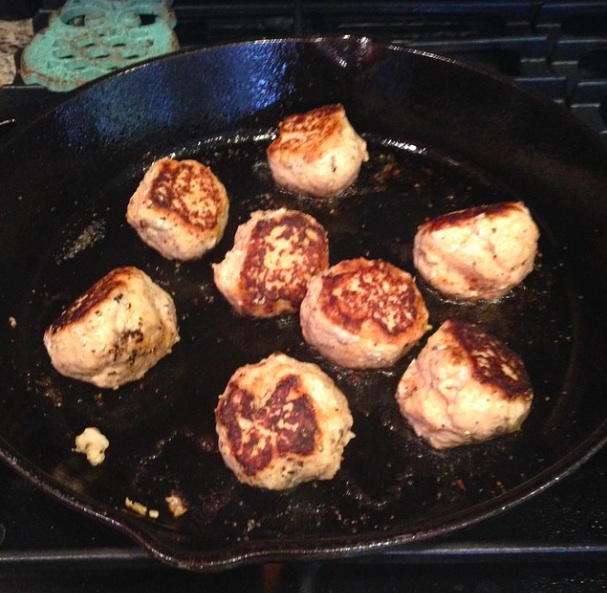
  6. Form into tablespoon-size balls and place on an oiled baking sheet.
  7. Broil for 5 minutes, or until the meatballs are beginning to brown and are just barely cooked through.
  8. Remove from the oven and set aside.
  9. In a large skillet, heat 1 tablespoon olive oil over medium-high heat.
  10. Add the mushrooms and cook, stirring with a wooden spoon, until the mushrooms are brown on all sides, about 5 minutes.
  11. Add the onions and the remaining 1/2 teaspoon salt and cook for another 2 minutes.
  12. Lower heat to medium and stir in the remaining almond flour and 1 tablespoon olive oil.
  13. Add 1/3 cup marsala wine and stir until smooth.
  14. Whisk in the chicken broth and simmer for 5 minutes.
  15. Add spiralized zucchini noodles to sauce and mix to coat.
  16. Add the meatballs and simmer for an additional 5 minutes to let the flavors blend.
  17. Serve hot, garnished with grated manchego.
http://inspiredeats.net/30-minute-meals-gluten-free-paleo-marsala-chicken-meatballs/

paleo curried shrimp

Curried shrimp and spinach

I ran across this recipe last year and it was a hit on the first try. I added some mushrooms in with the onions while sautéing (I’m a BIG fan of sautéed mushrooms) so when it came to the point of blending the onions and mushrooms mixture I left some in the pan to eat whole with the shrimp, and blended the other half as instructed. Either way, it was a delicious meal, and super easy and quick to make thanks to some frozen, de-veined shrimp.

Easy and delicious… two of my favorite things 🙂

paleo curried shrimp

Ingredients (Serves 4)

  • 2 lbs shrimps, peeled and deveined
  • 2 tbsp ghee or coconut oil
  • 1 onion, chopped
  • 2 tsp curry powder
  • 2 tsp tomato paste
  • 1/2 cup gluten-free chicken stock
  • 1 cup full-fat coconut milk
  • 2 tightly packed cups shredded spinach
  • Sea salt and freshly ground black pepper to taste

Preparation

  1. Heat a large skillet over a medium-low heat and cook the onion in the ghee, butter or coconut oil until it begins to soften, about 3 minutes.
  2. Season to taste with sea salt and freshly ground black pepper, stir in the curry powder and continue cooking for a minute.
  3. Place mixture in a blender or a food processor, add the tomato paste as well as the chicken stock and coconut milk. Process or blend until smooth.
  4. Pour the mixture back in the skillet and bring to a simmer.
  5. Add the shrimps and spinach and cook, covered, for about 5 minutes, until the shrimps are just cooked.

Paleo BBQ chicken meatballs

If you’re following the Paleo diet, you know how important prepping your meals ahead of time is. Otherwise you find yourself coming home from work,  starving, and grabbing whatever you can find to eat instead of taking the time to make a healthy meal. That basically means we spend our Sunday afternoons prepping meals for the week, especially ones that can reheat well and still be as good as they were when first made.

Like these guys.

I love meatballs. I can eat them on top of zucchini noodles, spaghetti squash or all by themselves. I like to make this BBQ version to change up the typical Italian meat sauce flavor and throw in a little Texas kick to our meals. You can use pork or beef as well, but chicken makes a great option and the flavors work so well together that we usually just stick with chicken. If you change it up at all, be sure to share so we can try your version too – Paleo love!

Paleo/Gluten-free Meatballs
1 lb Organic, ground chicken 
2-3 TBS flax meal (or coconut flour)
1 large free-range egg

Fresh garlic and basil make great additions, or you can season with Italian seasonings, salt, pepper, garlic powder and onion powder.  Season to your liking – I use around a dash to 1/2 tsp for each spice.

Instructions:

  • Preheat cast iron skillet to medium-high heat, and grease with coconut, avocado or MCT oil (best for high heat cooking)
  • Mix all ingredients together in a bowl.
  • Roll into golf ball size meatballs.
  • Drop meatballs carefully into the pan and allow to brown on each side for a few minutes.
  • Roll meatballs with wooden spoon so all sides are evenly cooked, or of approximately 15 minutes.
  • Reduce heat to low, and add BBQ sauce to the pan.
  • Simmer at low heat for an additional 10 minutes. Serve with extra sauce for dipping.
  • Enjoy!


Paleo BBQ chicken meatballs


Here’s one of our favorite recipes for BBQ sauce…

Paleo BBQ Sauce

1 Tbsp Coconut oil
3 cloves mince garlic
1/2 medium-large sweet onion, minced
1 Tsp organic spicy/dijon mustard
1 Tsp smoked paprika
1 Tsp chipotle seasoning (optional)
1 Tsp cumin
1 1/4 Cup chicken broth(can also use veggie broth or plain water)
Juice of 1.5 limes

1.5 TBS Braggs or Coconut Aminos
6 oz can of ‘no salt added’ tomato paste

Instructions:

  • Heat coconut oil in a pan.
  • Add garlic and onions and saute till translucent/soft.
  • Add mustard, paprika, chipotle, cumin and continue to cook.
  • Add remaining ingredients and whisk till smooth.
  • Bring to a light boil, reduce to simmer and partially cover with lid.
  • Simmer 45 minutes and let cool.

Paleo BBQ chicken meatballs

I LOVE chocolate. The taste, the health benefits and the way it feels when a rich, delicious piece melts in my mouth and makes the sides of my throat tingle with its deliciousness – so many reasons to love it. But since I follow a paleo diet, I try to avoid sugar, so I had to find a way to enjoy a chocolatey flavor that was sugar-free, and mostly paleo. Then I discovered these guys – they’re frozen, chocolate banana bites that are packed with coconut oil goodness, raw cocao and bananas, so if you’re trying to make sure you eat enough coconut oil,  this is a great way to help.  Because coconut oil melts at room temperature, keep these in the freezer and take out one or two when the urge hits, let it defrost for a few minutes and enjoy. 


Frozen coconut oil chocolate banana bites (GF, Vegan, Paleo)

Frozen coconut oil chocolate banana bites  (GF, Vegan, Paleo)

Ingredients

  • 2 ripe bananas
  • 1 Cup Coconut Oil
  • 2 TBSP Raw Cocoa
  • 1 TBSP Cashew or almond butter
  • 1 dropper full of liquid stevia
  • Shredded coconut (optional)

Instructions

  1. Preheat pan on low to medium heat
  2. Add coconut oil and stir until melted (30 seconds or so)
  3. Add nut butter and continue stirring until melted and blended (about 1 minute)
  4. Add cocao and stir until blended
  5. Add stevia
  6. Remove from heat
  7. Slice bananas into 1 inch thick slices
  8. Dip banana into pan and fully coat with chocolate sauce
  9. Remove slices and place in a pan for freezing (I use a mini cupcake tin)
  10. Sprinkle with shredded coconut (optional)
  11. Freeze for 2 hours
  12. Remove from tin and place in frozen ziplock bag for storage.
  13. Enjoy!
http://inspiredeats.net/frozen-choco-banana-bites-gf-vegan-paleo/

Sometimes I’m lazier than others about making Sunday a food prep day – I’m a ‘Sunday Funday’ kinda girl so I rarely want to spend the day prepping food for the week. Yesterday was one of those days, so I want something quick and easy to prep that would give us some options throughout the week. 

When you’re following a Paleo lifestyle, it’s best to set aside a day where you plan the upcoming week’s meals to avoid being faced with having to prepare a big meal whenever you’re hungry. So yesterday I convinced my fabulous husband to make his ah-mazing slow cooker ribs so we would have leftovers for the week. Along with a 2lb bag of carrots, these ribs make for a perfect meal throughout the week, and they’re super easy to prepare.  

Remember, prepping is key to Paleo success, so I would definitely invest in a good slow cooker similar to the one we have which you can find hereIt’s relatively inexpensive at only $23.99 and we’ve had ours for years and love it!  

So here’s our simple recipe for delicious allergy-free, Paleo ribs! Note – the Paleo BBQ sauce found here works great with these!


paleo ribs
(more…)

cauliflower pizza crust

Yes, it’s possible to be gluten-free and paleo and still love your pizza!

Last year I ran across a cauliflower pizza recipe which we tried while my mom in law was in town, and it was a BIG hit! We all loved it, though my only complaint was that it wasn’t sturdy enough to pick up and eat since I chose to leave out the cheese from the crust. But we all dug in with forks and knives, and while it wasn’t the same as the slices of heaven I used to love in NY, it was still a tasty version of pizza. Yay for options!

So here’s the original recipe; you can choose to eliminate the cheese from the crust as we did, but just be warned that it won’t be sturdy enough to pick up.

Note that I substituted goat cheese for mozzarella and instead of hawaiian style I added spinach and prosciutto. Delish!

Oh, and for those of you (like my husband) who don’t love cauliflower, no worries – the cauliflower flavor is undetectable 🙂

Enjoy!


cauliflower pizza crust


(more…)

Guest writer, Elissa, shares her favorite Paleo pizza creation with us. Thanks Elissa – we can’t wait to try this one! 

When beginning with Paleo I was overwhelmed.  What was I to do with all the new information I have learned with the new cooking staples in my pantry?  These things I had not experience with, could I even call them staples?  I knew I had a task laid before me if I were to survive this much needed lifestyle transformation.

I will be the first to admit, I don’t follow rules and directions well.  Unlike my mother who strict follows every recipe down to the last granule, I cool and bake with my gut.  Recipes are simply for time, temp, and ingredient suggestions that you can take or leave.  When I am creating something delicious there is a thing that happen inside of me, something magical turns on and more often than not the thing that results is a culinary delight.

PIZZA……who doesn’t love PIZZA?!  A favorite American treat loved by many from the time they could ingest until the time they can do so no longer.  Pizza…..one of the very first things I knew I was going to have to get down right, there was no way I could or wanted to go without it.

When it came to creating the delicious I knew I was going to have to dissect the recipe full of wheat and dairy to determine what exactly is was that made pizza so desirable.

Crust:  Even as a child, I never had much use for the stuff.  It was just like a plate for the gooey goodness.  Who eats the plate?

Cheese:  Oh cheese how I loved thee, but cheese in all of its gooey glory was in NO WAY worth the grumbling in my tummy (insert vision of Winnie the Pooh).

Things of Importance:  Meat, vegetables, and the amazing sauce with its desirable seasoning.

What was a girl to do?  I had absolutely no desire to Paleoize (to make a food dish that is in no way Paleo include Paleo ingredients; these are often high in natural sugars, nuts, and starches), resembled a crust. I try to steer clear of Paleoizing anything, to me, often takes away the deliciousness and nutritious things Paleo offers.  There had to be a simple way, some sort a vessel.

As I stared blankly into my fridge searching for an answer, there is stood in its green glory!  A green pepper!  Of course it made sense, so simple, a green pepper with bowl potential.  Not a new theory, stuffed peppers have been around for decades!  All of the AMAZING pizza toppings stuffed inside of a common topping itself.  No wheat or dairy and nothing was Paleoized in the creation.  Simple ingredients, combined.


paleopizzas


cheesy note:  Cheese.  For me it was nearly impossible to give up completely.  But I simply refused to allow non-food, man-made chemicals to enter my clean body.  I went on a hunt for a treat in hopes of what I found didn’t cause any digestive distress.  On my hunt I found raw cheddar cheese.  Cheese with no unnatural ingredients made out of raw, unpasteurized milk.  I gave it a whirl and to my surprise there was NO digestive issues!  Now from time to time when I stray the non-dairy path I indulge in raw cheeses from cows, sheep, or goats.

Is there really an occasion that wouldn’t call for pie? That’s our feeling at The Little Aussie Bakery & Cafe, where we make pies of the sweet and savory variety. Pies for lunch! Pies for picnics! This is also a great crust to use for quiche. They can be frozen for future use! Here’s the recipe and how-to for getting the perfect pie crust that also happens to be good for you, gluten-free…

Pie Crust


Make a Perfect Pie Crust (that happens to be gluten free!)

Ingredients:

  • 4 Cups All Purpose GF Flour (Little Aussie Bakery Brand)
  • 1.5 tsp Salt
  • 2 Tbs Guar Gum
  • 1 lb Butter (or any shortening of choice)
  • 1 Tb Vinegar
  • 1.5 – 2 Cups Ice Water

Preparation:

  1. Mix together dry ingredients in a large bowl
  2. Cut butter/shortening into the dry ingredients, and mix until the combined consistency is crumbly
  3. In a separate bowl, mix together vinegar and ICED water. Add this SLOWLY (a few tablespoons at a time) to the dry dough, kneading together until the dough binds together in a smooth consistency.
  4. Press the dough into pie tins immediately (do NOT refrigerate)
    >>They may frozen for future use in their individually pressed pie tins
  5. Add pie filling and bake as directed by your pie recipe

The Top Crust Technique:

Rolling close up

Roll from the center towards the edges for an even crust


Shape a ball of dough with your hands – think of playing with playdough! – into a sphere. Then, pinch its round center with your thumbs, and move the dough outwards into a fat disk or puck shape. This pre-formed shape will ease the rolling process.

Roll the dough with a flour-dusted rolling pin (be sure to stay consistent by using GF Flour!). Then, similar to the pinching process, focus on rolling from the center of the disc moving towards the rims. This will better yield an even top crust. Roll to the circumference of your pie, then place on top!

Pinch the layers together around the pie rim, then brush the whole top with milk (use dairy free if preferred!) to brown well while baking.

The Little Aussie Bakery & Cafe bakes and writes for gluten-free foodies. On their blog you can find more recipes, baking insight, and information on health and wellness. Their goods can be found on the online store.


This is a guest post from Megan Cannon, a guest author who shares her experience prepping a variety of allergy-free friendly foods.


Throughout the course of the holiday season – which, somehow, only now feels like it’s winding down completely – my family participates in (or sometimes hosts) several large group dinners. These dinners, attended by family and friends from all over, are always fun, but they can be incredibly stressful to put together. While feeding a crowd of people can be a daunting task in itself, there is the additional challenge that our meetings include people with a wide range of dietary restrictions: pescetarian/vegetarian, nut-free, lactose intolerant…you name it, we have it. So this year, I came up with a dish that could be easily changed to accommodate all those special diets, but that is pretty simple to put together. Best of all, it’s one of my favorite (although often underrated) comfort foods: stuffed peppers.

These stuffed peppers are extraordinarily customizable, which makes them a definite crowd-pleaser…whether the crowd is a party or a simple weeknight meal with the family. I think they would even transition well as the weather gets warmer, since they are not as dense as traditional stuffed peppers; instead of the typical rice and beef filling, these are packed with quinoa, making them a much lighter dish (but don’t worry – they are still protein-packed and entrée-friendly).

Quinoa-Stuffed Peppers (Gluten-free, vegetarian option)

Ingredients

  • 6-8 bell peppers (any color), seeded
  • 1 cup quinoa
  • 2 cups vegetable broth
  • ½- 1 cup frozen chopped broccoli
  • ~1 cup shrimp (more if you like; omit for vegetarian version)
  • ¼-1 cup sauce or marinade, plus more for drizzling (Use whatever you like here. Whatever your favorite sauce is, whether homemade or a trusted store-bought brand, it will probably work. I like to use a tangy, slightly spicy sauce in this mixture; recipe follows.)
  • ¼-1/2 cup sharp cheddar cheese, optional
  • Spicy Sweet Sauce:
  • ½ cup peach preserves
  • ¼ cup lemon juice
  • 2 tablespoons pickle juice (optional, but strongly recommended)
  • ½ teaspoon crushed red pepper
  • 2 garlic cloves, minced
  • ½ teaspoon ground ginger
  • ½ teaspoon salt
  • Black pepper (to taste)

Instructions

  1. Preheat oven to 375 degrees F.
  2. Add ingredients together for the Spicy Sweet Sauce in small bowl; whisk until well mixed. As with most sauces, this tastes better after letting the flavors develop together for a little while, so try to let it rest in the refrigerator for about twenty minutes.
  3. Prepare a large baking dish by drizzling some of the sauce/marinade into the bottom; set peppers up in dish.
  4. Cook quinoa in vegetable broth according to package directions.
  5. Meanwhile, lightly sauté shrimp and broccoli in about half of the sauce or marinade.
  6. Add remaining sauce to quinoa; mix well. Incorporate shrimp and broccoli into quinoa, then scoop mixture into prepped peppers.
  7. Sprinkle the tops of peppers with cheese, if desired. Bake for 25-35 minutes, or until peppers are slightly blistered.

Notes

Change this recipe as much as you like; it’s really more of a guide, designed to be forgiving for widely varying diets. Add different (or extra) vegetables, swap out the shrimp, change the sauces, do whatever you think is best; just let it come together easily, and enjoy its simplicity, no matter how hectic the rest of the day may be.

http://inspiredeats.net/quinoa-stuffed-peppers-gluten-free-vegetarian-option-2/

Note: change this recipe as much as you like; it’s really more of a guide, designed to be forgiving for widely varying diets. Add different (or extra) vegetables, swap out the shrimp, change the sauces, do whatever you think is best; just let it come together easily, and enjoy its simplicity, no matter how hectic the rest of the day may be.

We’re big fans of a tender, juicy roast, and love the simplicity of a basic Roast Beef. While there are some more intricate methods which include basting, stews and crock pots, we like to keep ours simple by roasting it with a touch of salt and pepper.

I promise you this is the easiest Roast Beef recipe you will ever make, and you will absolutely love how tender and delicious it is! You’ll need to set aside an hour or so for this one, and make sure you have a meat thermometer handy. The key to not over cooking a roast is to use the thermometer and set it for 125 degrees. Thats the magic number which leaves your roast juicy, tender and perfectly delicious.  This version is naturally gluten-free, and suits the Paleo, Primal Blueprint and GAPS diets just fine. In fact, so long as you’re a meat eater, you’re good with this one!

We like to grill some squash to pair with it, and add some grilled asparagus and toasted pumpkin seeds to a balsamic vinegar and EVOO salad.

So simple. So good.


Amazingly simple Roast Beef with Grilled Squash

Amazingly simple Roast Beef with Grilled Squash

Ingredients

  • 1.5 lbs Top Round Roast
  • Salt and Pepper to taste
  • Additional roasting pan ingredients include carrots or potatoes

Instructions

  1. Preheat oven to 300 degrees
  2. Prep the roast and sprinkle generously with salt & pepper
  3. Place roast in roasting pan and surround with potatoes or carrots
  4. Insert meat thermometer and place pan in oven
  5. Baking times will vary so watch the thermometer (generally 20 minutes per lb is good)
  6. Once the thermometer hits 125 degrees remove the roast from the oven and let cool for a few minutes before carving
  7. Serve with your favorite glass of Cab, grilled veggies and a side salad with balsamic vinegar and EVOO for a great pairing!
http://inspiredeats.net/amazingly-simple-roast-beef-with-grilled-squash/

Breakfast for dinner was always one of my favorite things as a kid.

I loved it when my mom would make scrambled eggs, french toast and bacon for dinner. I’m not sure why it has such a strong appeal, but our son is just as excited about the whole ‘breakfast for dinner’ thing today as I was 30 years ago.

Though today’s French Toast is slightly different from the version I used to eat as a child; if you call egg free, dairy free and gluten-free slightly different from traditional French Toast. Yep, our version today is gluten, dairy and egg-free, so we use a Vegan bread too.

I have to admit I love a good challenge, so I gave this several go’s before getting it right.

frenchtoast-step1


Using banana and either chia or flax seeds help keep the batter thick and it sticks well to the bread, but it also makes it stick to the pan.  So the key is to keep your pan well oiled in between flipping the slices.

Next challenge? Egg, gluten and dairy-free spiced cake. My first attempt was not a big hit, so it was back to the drawing board. At least I got this one right, something I was sure of when I saw my son licking his battered fingers after dipping the slices. He loved the flavor so much that he ate the first slice dry. No syrup needed to make this little guy happy!


Skillet French Toast (Dairy, Egg, Gluten and Nut free)

Prep Time: 5 minutes

Cook Time: 10 minutes

Total Time: 15 minutes

Yield: 2 servings

Skillet French Toast (Dairy, Egg, Gluten and Nut free)

Ingredients

  • 3 ripe bananas
  • 1 Cup dairy-free milk of choice (can be vanilla flavored or sweetened if preferred)
  • 2 Tsp: cinnamon
  • 1/2 Tsp: pumpkin pie spice (optional, but we love it!)
  • 1 Tbsp: vanilla
  • 6-8: slices of gluten free bread of your choice
  • 2 Tbsp: Coconut Oil for skillet (make sure to keep skillet well greased in between batches)
  • Fruit of choice as toppings (blueberries, strawberries, sliced bananas, blackberries, etc)
  • 1 Tbsp: ground chia seeds or flax meal (optional)

Instructions

  1. Blend bananas, milk, cinnamon, pumpkin pie spice, vanilla, and chia or flax seeds in blender or food processor and pour mixture into wide bowl.
  2. Preheat skillet to medium-high heat.
  3. Gently dip bread slices into the mix, coating both sides well.
  4. Add approx. 1 Tbsp Coconut Oil or Olive Oil to skillet.
  5. Fry coated bread slices in skillet until golden brown, about 2-3 minutes on each side. Be sure to add more oil in between slices as needed to keep skillet well oiled.
  6. The banana makes the bread sticky, so be sure to use enough oil to keep the skillet greased thoroughly.
  7. Service with Organic Maple Syrup and fresh fruit. Sprinkle with powdered sugar if desired.
  8. Enjoy!

Notes

Notes: Chia and Flax seeds add omega 3 fatty acids to the recipe and give it a slightly nutty flavor. You can omit Chia and Flax seeds if you can’t tolerate seeds as the banana acts as the binding agent in place of eggs.

http://inspiredeats.net/skillet-french-toast-dairy-egg-gluten-and-nut-free/

Remember, the banana makes the bread sticky so be sure to keep the pan well-greased in between flipping the bread. Also, if you want this to be truly vegan, be sure to use a vegan bread. And save some of the batter from your blender and store it in the fridge overnight for another round of french toast the next day.

Allergy free and easy  – two of my favorite things in life!


My son’s holiday party is today, and the kids were asked to bring in a special treat that symbolizes their family heritage. Since my family tended to center around the kitchen, that wasn’t a problem for me. The real challenge was in making an updated gluten-free, dairy-free version that my son could enjoy too.  Since he can eat eggs I made this version with eggs, but if you’re following an egg-free diet, you can use your preferred egg substitution (ours is typically 1 TSP ground flax seed and 3 TSP water per egg).  If you’re not into flax, here are some other options that have been shared with us.  Some I’ve tried, many I haven’t, so I can’t speak for all of them.

1 egg =

  • 1/2 mashed banana
  • ¼ cup applesauce or pureed fruit
  • ½ cup soy yogurt
  • 1-1/2 teaspoons of Ener-G  Foods Egg Replacer  +  2 tablespoons  lukewarm water (Ener-G is a powder commercial egg substitute)
  • 1 tablespoon ground flaxseed meal + 3 tablespoons water
  • 1 tablespoon ground flaxseed meal + 3 tablespoons water + 1 tablespoon mild flavored cooking oil + 1 teaspoon low sodium baking powder + 1 teaspoon tapioca or potato starch or corn starch
  • ¼ cup mashed white potatoes or  sweet potatoes
  • 2 tablespoon potato starch, cornstarch, or arrowroot
  • 2-3 tablespoons of tomato paste
  • ¼ cup cooked oats
  • 2-3 tablespoons of bread crumbs
  • 2-3 tablespoons of flour
  • 1/4 cup of tofu blended (any kind) with the liquid ingredients in the recipe


As for our spiced cake, this is a play off of a favorite of mine from childhood; a Swedish spice cake called Pepparkakor. My updated version is gluten and dairy-free, and since I can’t try it I had to rely on my son’s review… “it’s AWESOME mom” 🙂


Gluten-free, Dairy-free Swedish Spiced Cake spicedcake2

What you’ll need: 

  1. 2 1/2 cups blanched almond flour (or preferred GF flour substitute)
  2. 1/2 teaspoon salt
  3. 1/2 teaspoon baking soda
  4. 1 tablespoon ground cinnamon
  5. 1 teaspoon ground allspice
  6. 1/2 teaspoon ground nutmeg
  7. 1/4 teaspoon ground cloves
  8. 1/4 cup brown sugar
  9. 1/4 cup coconut oil, melted over low heat and cooled slightly (can substitute for butter)
  10. 3 large eggs
  11. 1/2 cup honey
  12. 1/4 cup pure maple syrup
  13. 1 tablespoon vanilla extract


How you’ll make it: 

1. Preheat the oven to 350F. Grease an 8-inch square baking dish (you can also use a 9×9) with oil and dust with almond flour.

2. In a large bowl combine the almond flour, salt, baking soda, spices, and brown sugar.

3. In another medium bowl combine the melted coconut oil (make sure it isn’t hot or you will scramble the eggs), eggs, honey, maple syrup, and vanilla.

4. Stir the wet ingredients into the dry until thoroughly combined.  Scoop batter into the prepared baking dish.

5. Bake for 30-35 minutes or until a toothpick inserted into the center comes out clean.

6. Let the cake cool for 1 hour then serve.


Enjoy!