I just discovered a new vegan foodie blog today and found this delish looking recipe for gluten free, vegan waffles. When you get a chance, hop over to visit An Unrefined Vegan, described as Unprocessed, unbleached and cruelty-free:  low-fat, low-sugar, whole food and plant-based recipes to nurture body, brain and conscience. Her food choices are creative, sound incredible and I love her photos! Great blog to bookmark 🙂

I’m sure it would taste just as good with traditional eggs and buttermilk for the non vegans here, so go ahead and experiment a bit and tell me how it turns out!

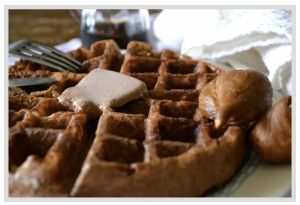
Gluten free, vegan: Banana-Chai Buttermilk Waffles with Cocoa-Coconut Butter

Prep Time: 10 minutes

Cook Time: 10 minutes

Total Time: 20 minutes

Yield: 3+ 8" waffles

Serving Size: 1 8

Ingredients

  • 1 cup spelt flour (use gluten-free flour or flour substitute such as almond flour for gluten free version)
  • 1/3 cup oat flour (use certified gluten free oats and process them in a food processor)
  • 1/2 cup almond meal (I used the meal left over from making almond milk, dried and processed in food processor)
  • 1 1/2 tsp. baking powder
  • 1/2 tsp. salt
  • 1/4 tsp. baking soda
  • 1/4 tsp. powdered stevia
  • 1/4 tsp. anise seeds (ground in coffee grinder)
  • 1/4 tsp. powdered cardamom
  • 2 pinches ground black pepper
  • 1/4 tsp. ground cinnamon
  • 1/8 tsp. ground cloves
  • 1/4 tsp ground ginger
  • 2 tbsp. egg replacer + 6 tbsp. water (whisk together until frothy, then let sit for a minute)
  • 1 large, very ripe banana, mashed
  • 1 1/2 cups vegan buttermilk
  • 1 tsp. vanilla extract

Instructions

  1. Combine the flours, almond meal, baking powder, salt, baking soda, stevia and spices in a large bowl.
  2. In a smaller bowl, whisk together the egg replacer, banana, buttermilk and vanilla extract. Add the wet ingredients to the dry ingredients and stir just until the dry ingredients are just moistened. Let the batter sit for about 15 minutes. (Turn the oven on to 200F so you can warm the plates and keep the cooked waffles crispy – and heat up the waffle iron, too.)
  3. Lightly spray waffle iron with cooking oil and ladle on the batter. Cook for about 4-5 minutes and gently remove waffle and place on oven rack to keep warm while you prepare the rest of the waffles.
  4. Top with a dab, slab or slice of Cocoa-Coconut Butter and your other favorite waffle toppings!
http://inspiredeats.net/gluten-free-vegan-banana-chai-buttermilk-waffles-with-cocoa-coconut-butter/


Cocoa-Coconut Butter

Ingredients

  • Cocoa-Coconut Butter
  • 1/4 cup + 2 tsp. soy milk
  • 1 tsp. apple cider vinegar
  • 1/8-1/4 tsp. salt
  • 2 1/4 tsp. soy lecithin granules
  • 1/4 tsp. xanthan gum
  • 1/2 tbsp. unsweetened cocoa powder
  • 3 tsp. agave nectar
  • 1/4 tsp. vanilla extract
  • 1/2 cup + 2 tbsp. + 1 tsp. refined coconut oil
  • 1 tbsp. canola or vegetable oil

Instructions

  1. In a small measuring cup, whisk together the soy milk and cocoa powder until thoroughly combined. Whisk in the salt and apple cider vinegar and let sit for 10 minutes.
  2. Melt the coconut oil in a small measuring cup. It’s not necessary to completely melt it down – some small solid bits are okay. In the bowl of a food processor, add the melted coconut oil, canola oil, soy milk mixture, soy lecithin granules, xanthan gum, agave nectar and vanilla extract.
  3. Process for 1 minute, then scrap down the sides and bottom – sometimes the soy lecithin granules get stuck near the blade. Process for an additional minute, then carefully pour the mixture into the molds.
  4. Chill in the freezer for at least one hour before removing from molds. Store in the refrigerator or freezer.
http://inspiredeats.net/gluten-free-vegan-banana-chai-buttermilk-waffles-with-cocoa-coconut-butter/


For those of us living a gluten-free life, mastering a tasty, fluffy bread can be a bit challenging. Thanks to one of my fave cookbooks, The Gluten Free Almond Flour Cookbook, this delish bread is a great base for sandwiches, hors d’oeuvres or as a simple tasty snack. You can cut this loaf into thin slices, spread on a baking sheet and toast in the oven at 350° F for 5 to 10 minutes. Spread the resulting cracker with hummus, goat cheese, feta, or drizzled with your favorite olive oil.

The possibilities are endless!


(more…)

For those of you following a gluten free and paleo diet, the occasional comfort food meal is encouraged, so long as you stick to the healthy Paleo guidelines. So when I saw this post on Cavegirl Cuisine’s site for a gluten free, paleo eggplant recipe, I had to share it. Our version is slightly modified, but you can see her original version here

What I love about this recipe is the almond meal which helps the eggplant maintain a crunchy, fried, aspect to it, even though it’s baked.  So you can enjoy this guilt-free, delish version of a formerly unhealthy meal! 

Paleo “Fried” Eggplant Marinara (on a bed of greens)

Prep Time: 15 minutes

Cook Time: 30 minutes

Total Time: 30 minutes

Yield: 4 servings

Paleo “Fried” Eggplant Marinara (on a bed of greens)

Ingredients

  • 1 medium eggplant
  • 2 cups almond meal
  • 1 cup marinara sauce or fresh diced tomatoes
  • 2 eggs
  • 4 cups of greens (I used arugula)
  • 1T macadamia nut oil

Instructions

  1. Preheat oven to 400 degrees.
  2. Line two cookie sheets with parchment paper.
  3. Peel eggplant and slice into 1/4 inch rounds.
  4. Whisk eggs in a medium bowl.
  5. Place almond meal in another bowl.
  6. Dredge each eggplant round in the eggs and then coat with the almond meal on each side.
  7. Place on the parchment paper
  8. Repeat for all of the eggplant.
  9. Drizzle or mist the oil over the coated rounds.
  10. Salt and pepper lightly.
  11. Cook for 30 minutes.
  12. In the meantime, place a cup of greens on each plate.
  13. Divide the cooked eggplant among the plates.
  14. Put a 1/4 cup of marinara sauce or fresh tomatoes over the top of each serving. Enjoy!
http://inspiredeats.net/paleo-fried-eggplant-marinara-on-a-bed-of-greens/


From mid November through early January, most people find themselves juggling multiple holiday parties, elaborate dinners, family get-togethers and perhaps the recipient of some well-intentioned holiday cookie platters from loving friends and neighbors.  If so, then you know all too well the inner battle that makes up your dreaded “holiday challenge”.

If you’re like me, and you have food allergies, this can be the most challenging time; when I see cookies and cupcakes galore, and my mouth waters as I recall long-time family recipes of spiced cakes, cookies and pies. This is the time of year I wish the most that I was without food allergies. So, I’m here to share some of my tips for remaining strong, against your weak of heart moments, and helping guide you to a path towards allergen free goodies that are sure to satisfy your cravings!

So, as I continue to build out the site, I am focusing first on the research aspects of the various health issues Wellness Dish is designed to guide you through, and the recipe sections will be last. Since I don’t yet have them live, I will link out to some recipes I love and hopefully they can help you to navigate your way through a healthy and delish holiday!

Allergen free tips:

One very useful (and much healthier) flour alternative is almond flour. Almond flour is highly nutritious, easy to use and readily available. For those of us watching our glycemic index, almond flour is high in protein, low in carbohydrates and low in sugars.

Unlike other alternatives to wheat flour, almond flour is moist and delicious. My go-to chef for cooking with almond flour is Elana of Elana’s Pantry. I was given her book recently as I began to explore baking with almond flour, and I started making my way through her many recipes.  As she puts it, “After having tested just about every gluten free flour out there, I can save you a lot of time and hassle when I say that almond flour is far superior to other flours in terms of taste, nutrition and ease-of-use.”
Here’s a fave of ours, though you can browse the hundreds of other recipes from Elana on her site here:


http://www.elanaspantry.com/chocolate-strawberry-shortcake/print

chocolate strawberry shortcake gluten-free recipe

This simple gluten-free shortcake recipe is easy enough to make with your children

 Chocolate Strawberry Shortcake

Gluten Free Chocolate Biscuits:

Filling/Topping:

  1. In a large bowl, combine almond flour, coconut flour, cocoa, salt and baking soda
  2. In a smaller bowl, combine eggs and agave
  3. Stir wet ingredients into dry
  4. Batter will be wet, so using a 2 tablespoon scoop, scoop batter onto a parchment paperlined baking sheet
  5. Bake at 350° for 12-15 minutes
  6. Cool biscuits completely and set aside
  7. In a large bowl, whip cream, agave and vanilla
  8. Slice biscuits in half horizontally
  9. Place bottom halves on a platter; top each one with a dollop of whipped cream and strawberries
  10. Top with remaining biscuit halves, and more whipped cream and strawberries
  11. Serve to your hungry gang