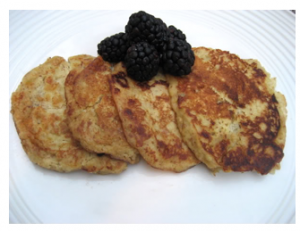
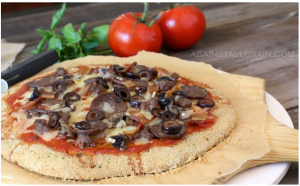
Pizza nights are back!

Danielle of Against All Grain has done it again!

This time she has come up with a grain free pizza crust that claims to be delicious, and to hold up against its gluten and grain-full competitors, unlike some of the other grain free crusts we’ve tried which don’t allow you to pick up and indulge in a little slice of pizza heaven. 

She tops her with some of the delicious and healthy meats from US Wellness Meats, though we left the toppings up to you on this one, so go ahead and indulge in your favorites. Some of ours include goat cheese, spinach, garlic and tomatoes.  Another fave is sauce, ham and pineapple.  And yet another is the meat lovers favorite with proscioutto, sausage, ground beef and jalapeno. 

Truth be told, top it with whatever fresh and delish toppings you want and simply enjoy the ability of savoring pizza again on a grain free diet! 


Paleo, Gluten Free Pizza Crust

Prep Time: 20 minutes

Cook Time: 25 minutes

Total Time: 45 minutes

Paleo, Gluten Free Pizza Crust

Ingredients

    INGREDIENTS - CRUST
  • 3/4 cup whole raw cashews (or 1 cup cashew flour)
  • 3 tablespoons almond flour
  • 1/4 cup coconut flour
  • 1/2 teaspoon baking soda
  • 1/2 teaspoon salt
  • 1/8 teaspoon garlic granules
  • 2 eggs
  • 2 tablespoon almond milk
  • 1/2 teaspoon apple cider vinegar
  • 2 1/2 tablespoons extra-virgin olive oil
  • 1 tablespoon cold water
  • 1 tablespoon fresh parsley
  • 2 tablespoons fresh basil
  • INGREDIENTS - PIZZA
  • 1/2 cup marinara sauce
  • 3/4 cup US Wellness Meats Raw Mozzarella Cheese, shredded
  • 1/4 USWM Salami, casing removed and thinly sliced
  • 1 USWM Italian Sausage, casing removed and pre-cooked
  • 2 pieces USWM sugar-free bacon, cooked and chopped
  • 1/4 cup mushrooms
  • 1/4 cup black olives, pitted and sliced

Instructions

  1. Preheat oven to 350 degrees.
  2. In a food processor, pulse the cashews until a fine flour has formed.
  3. Add in the almond flour, coconut flour, baking soda, salt, and garlic granules, then process the mixture for 1 minute.
  4. Add the eggs, almond milk, apple cider vinegar, olive oil, and water and process for another minute. Scrape down the sides of the bowl and pulse a few more times until you have a very smooth dough.
  5. Add the parsley and basil, and pulse two more times to roughly chop and incorporate the herbs.
  6. Let the dough rest for 2 minutes to let the coconut flour absorb some of the liquid.
  7. Sprinkle a piece of parchment paper with a little almond flour, then turn the dough out onto the counter. Sprinkle a little more flour on the top of the ball of dough, then place another piece of parchment on top.
  8. Use your hands to flatten the ball into a disc, then lightly roll out the dough into a circle that is 1/4 inch thick.
  9. Remove the top piece of parchment and carefully slide the other piece with the crust onto a pizza pan.
  10. Bake the crust for 12 minutes, or until it has puffed up and is golden brown around the edges.
  11. Top with sauce and your favorite toppings and bake for another 10-15 minutes.
  12. Enjoy!
http://inspiredeats.net/paleo-gluten-free-pizza-crust/


As many of you following a paleo diet can relate to (and as this Italian-raised girl often blogs about) the old pasta dish is one of the most commonly missed dishes in my home. I grew up on homemade pasta dishes covered in homemade sauces, used as a base for lasagna and nestled in between fresh mozz and ricotta cheeses as a baked ziti.  So when I found out I had to give up pasta, I felt sad and a bit scared; scared of never enjoying my old favorites again. 

And it didn’t take long for me to hop online searching for an alternative pasta once I went paleo and kicked out all grains for good. Soon I discovered many posts about “zuchinni pasta”.  Sliced lengthwise, about one-eighth-inch thick (which you can also do it with a sharp knife, but it’s easier with a mandoline), zucchini ribbons can stand in for regular pasta. (Steam them for a couple of minutes until they’re crisp-tender.)

So when we ran across this paleo, dairy free ‘pasta’ dish on All Against the Grain, we were so excited to give it a test as it meets not only our gluten free, but our paleo needs too. And as Danielle who writes All Against the Grain often does, she was inspired by a similar recipe she found online and tweaked it a bit for her own tastes. 

The version we made at home was slightly different, so you can read her original post here and below for our modified version. 

This tasty little treat is not only grain free, but it’s dairy free as well, and with a quick omission of the prosciutto, it’s vegan friendly too. How perfectly balanced is that?  Food and health in harmony; life is good 🙂


Paleo zucchini “pasta”

Prep Time: 15 minutes

Cook Time: 15 minutes

Total Time: 30 minutes

Yield: 4 servings

Serving Size: 1 plate

Paleo zucchini “pasta”

Ingredients

  • 4 medium zucchini, peeled and sliced into thin noodles
  • 1 cup asparagus pieces
  • 2 tablespoons virgin olive oil
  • 1/2 cup cherry tomatoes, cut in half
  • 1 cup fresh chopped mushrooms
  • 4 cups boiling water
  • 1 garlic clove
  • 2 tablespoons chopped basil
  • 1/4 teaspoon salt
  • dash of pepper
  • Garnish with toasted pine nuts and fresh basil

Instructions

  1. Steam or pre-boil the zucchini slices until they're slightly tender (about 3-4 minutes)
  2. Heat olive oil in a nonstick pan
  3. Mince cloves of garlic and add zucchini, asparagus and mushrooms together over medium heat until the zucchini softens but isn't mushy.
  4. Add tomatoes and remove from heat.
  5. Garnish with toasted pine nuts and fresh basil.

Notes

Alternate options include:

2 ounces prosciutto (omit for vegan and add 1/4 teaspoon salt) 1/2 cup frozen peas (omit if you’d like for Paleo)

http://inspiredeats.net/dairy-and-grain-free-creamy-pesto-pasta-with-spring-vegetables/
Paleo creamy pesto zucchini “pasta”


Sometimes I miss the salty crunch of chips, pretzels or crackers, so when the urge kicks in I turn to these guys; roasted, spicy chickpeas. They’re a tasty, easy to make treat and I typically have all the ingredients in the pantry. I discovered the recipe on What’s Gaby Cooking and I have to admit, I love the warm, spicy, toasty, salty combo! They make a great snack on their own, or as a side dish to your fave main course. 

All you need is 30 minutes, a can of garbanzo beans and some typical household spices. Kick up the heat for those of you with a flair for spicy. Enjoy!


Allergy-free, paleo roasted chickpeas

Prep Time: 5 minutes

Cook Time: 20 minutes

Total Time: 25 minutes

Yield: 1 yummy bowlful

Allergy-free, paleo roasted chickpeas

Ingredients

  • 1 15-oz can Garbanzo Beans
  • 1/2 tsp salt
  • 1/2 tsp garlic powder
  • 1/2 tsp red pepper flakes
  • 1/2 tsp paprika

Instructions

  1. Preheat the oven to 400 degree F.
  2. Drain and rinse the garbanzo beans in a large colander. Continue to rinse until all the foamy liquid goes away.
  3. Line the counter with a few sheets of paper towel. Place the drained garbanzo beans on top of the paper towel and let them dry for a few minutes.
  4. Once the beans are dried, place them on a parchment lined baking sheet. Drizzle with olive oil and then sprinkle on the spices. Using your hands, toss the beans around so they are all fully coated.
  5. Place the baking sheet in the oven for 20 minutes and all to roast. After 20 minutes, remove the pan from the oven and give the beans a little shake and then place back into the oven for another 20 minutes.
  6. Season with salt if needed once fully roasted and then serve.
http://inspiredeats.net/allergy-free-paleo-roasted-chickpeas/

Sweet, salty, creamy and crunchy. Too good to pass up!

I’ve mentioned how much I like this site, Against All Grain, in the past so today I’m showcasing another of her fab recipes which is perfect for summer! As someone who eats a lot of salads, I can tell you I’m excited to give this one a shot.  The idea of combining the sweet and gritty texture of watermelon with arugula and goat cheese is just too tasty to imagine. So while I head out to the store to grab some watermelon, I wanted to throw this recipe up so you can enjoy it in the meantime. 


watermelon salad with arugula, goat cheese & candied walnuts

Yield: 6 servings

Serving Size: 1 individual salad

watermelon salad with arugula, goat cheese & candied walnuts

Ingredients

  • 6 pieces of watermelon, cut to 1 inch thickness
  • 2 cups baby arugula
  • 2 tablespoons fresh mint, chopped
  • 2 teaspoons extra virgin olive oil
  • 1 teaspoon fresh lemon juice
  • pinch of salt and pepper
  • 1/4 cup crumbled goat cheese (omit Goat Cheese or sub in Vegan cheese for vegan options)
  • 1 teaspoon balsamic vinegar
  • 1/2 cup Spiced Candied Walnuts, roughly chopped

Instructions

  1. Using a large biscuit cutter, or just great circle cutting knife skills!, cut the watermelon slices into round circles. Use a knife to trim off any parts that make the circle uneven so it sits flat on a plate.
  2. In a medium bowl, toss the arugula with the mint, olive oil, lemon juice, salt, and pepper.
  3. Arrange the watermelon circles on a plate, then top each with a small handful of the arugula mixture (roughly 1/3 cup each).
  4. Sprinkle each salad with goat cheese and the chopped walnuts, then drizzle the balsamic vinegar over the tops.
  5. Enjoy!

Notes

* If you’re serving to a larger crowd, or don’t want to take the time to cut the watermelon into rounds, you can use a melon baller to create cute balls or just simply cut the watermelon into chunks and pile it all into a salad bowl.

http://inspiredeats.net/watermelon-salad-with-arugula-goat-cheese-candied-walnuts/


 Why we love Thunderbird – well, first, we haven’t tasted one we didn’t love! Not only are they handy and allergy-free friendly, they’ve literally saved us from a low-sugar driven faint spell. Well, it wasn’t quite that drastic, but they certainly helped stave off a cranky fit due to hunger pangs. Grab any of their 6+ delish bars and rest assured you will love any of their healthy, allergy-free friendly bars wrapped in eco-friendly wrappers.

I find them super handy to keep in my bags in case I find myself hungry at a sporting event, conference, travels, etc. and that inconvenient hunger pang hits when there are little (if any) allergy-free options around. My fave is the cashew fig because it’s not too sweet, and with the dates as a base, its moist, soft and totally satisfies! But with flavors ranging from Cashew Fig Carrot, Sweet Lemon Rain Dance, Cocao Hemp Walnut to name a few, these bars are sure to please every palette.

Good food, that is good for you and our pretty little planet. How can you go wrong?

In their words: Thunderbird Energetica specializes in creating epic tasting whole food energy bars. Containing uniquely pure and highly powerful ingredients, Thunderbird bars provide consumers with conveniently packaged, nutrient dense, plant-based goodness. Each bar is meticulously handmade using the finest and freshest available whole foods that Mother Earth has to offer.

Thunderbird Bars are 100% soy free, dairy free, gluten free, contain no added sugar energy  and give you the same clean burning fuel humans have enjoyed over the last 10,000 years.

Check out their site and buy some of these amazing bars today!

I don’t know about you, but one of the things I tend to crave when the cravings hit (and I should mention that they don’t come very often when you follow the paleo diet) is chocolate. So I was so happy to run across this tasty, guilt free treat to help satisfy those cravings when they hit!

I was browsing some of my fave sites today and ran across a new one so I can’t yet vouch for these, but they look delish and after reading a bit about the site’s owners and browsing their other recipes, I’m pretty excited to give this one a shot! Note that you can make them vegan by using dairy-free dark chocolate – yum!

Head on over to their site and view the orignal recipe here; http://www.neverhomemaker.com/2010/06/frozen-banana-bites.html 

Enjoy!!


Frozen chocolate peanut butter banana bites

Prep Time: 10 minutes

Cook Time: 5 minutes

Total Time: 15 minutes

Ingredients

  • 2 large bananas
  • 1/4 to 1/3 cup vegan chocolate chips
  • 1/4 to 1/3 cup natural peanut butter
  • Unsweetened coconut flakes

Instructions

  1. Set out a large plate or bowl with a piece of parchment or wax paper on it.
  2. Cut up the bananas into good-sized chunks. Each banana should give you around 5 to 6 pieces.
  3. Heat the peanut butter and chocolate chips in the microwave on high for about a minute. Then stir until smooth.
  4. Dip the banana pieces in the chocolate-peanut butter mixture. Lay them out leaving some space between them on the parchment/wax paper. Then when you've "covered" them all, use the remaining mixture to spoon over the tops (for even more chocolate-y goodness).
  5. Then sprinkle the unsweetened coconut flakes on top. Transfer to the freezer for about an hour until hardened.

Notes

You can enjoy them right after they're made (but they aren't frozen yet -- and when they're frozen, the banana tastes like vanilla ice cream). I suggest then covering with some plastic wrap (or really you can do all of this in some kind of Rubbermaid container) and let them freeze overnight.

http://inspiredeats.net/frozen-chocolate-banana-bites-vegan/


Today I stumbled upon a new site and found some delish looking baked zucchini chips which are a perfect solution for a no-grain diet. The site isn’t focused on allergy-free eating, but if you find yourself wanting some inspiration for yummy looking baked goods, it seems like Maggie of Vittles an Bits will be a good source I’ve copied her comments about the recipe below for reference and note that she’s very responsive if you have any questions so feel free to post them on her site.

For reference here is her link

Baked Zucchini Chips

Ingredients

  • 1 zucchini
  • Cooking spray
  • Seasoned salt, or other seasoning(s) of your choice

Instructions

  1. Preheat oven to 225 degrees Fahrenheit. Line a baking sheet with parchment paper or nonstick foil, and spray with canola oil. Set aside.
  2. Slice zucchini into thin medallions, about the thickness of a quarter. (You can either use a knife & a very steady hand, or a mandoline slicer.)
  3. Lay out slices on prepared baking sheet, and spray tops lightly with additional cooking spray. Sprinkle with seasonings of your choice. (A note on seasoning, however – use LESS than what seems appropriate. These shrink considerably in the oven, and if you use too much it gets very concentrated. It’s better to end up underseasoning and add more later.)
  4. Place in preheated oven and bake 45 minutes. Rotate baking sheet (don’t flip the chips though), and bake an additional 30-50 minutes, until chips are browned and crisped to your liking. These are best eaten within a couple hours of removing from the oven, as they start to get chewy if left out. One zucchini makes one serving (1/4 C. – 1/3 C. of chips depending on the size of your squash).
http://inspiredeats.net/baked-zucchini-chips/
 

From Maggie: 

To me, these chips taste kinda like thin & crispy pumpkin seeds.  (I guess that shouldn’t be too much of a surprise since they are relatives in the squash family).  Much lighter, but the taste is similar.

And the seasoning possibilities are endless – you can tailor them to your liking.  Garlic, paprika, chili powder… use your imagination!  I went with a basic Seasoned Salt and they came out great.  But whatever you choose, just make sure you go easy on the seasonings, and only use a little bit – these do shrink a lot in the oven, so what looks like a reasonable amount on the raw veggies could turn out to be way too much!

(more…)

I completely admire people who can cook; while I LOVE food, I sadly didn’t inherit the cooking gene so I default to recipes by those uber-talented folks I’ve discovered online. So today I share with you a recipe I ran across from a fellow Paleo girl. It looks divine and I’m hoping I can convince my hubby to make it for us this weekend 🙂 Thanks to Girlmeetspaleo for this inspired dish!

(more…)

For those of you following a gluten free and paleo diet, the occasional comfort food meal is encouraged, so long as you stick to the healthy Paleo guidelines. So when I saw this post on Cavegirl Cuisine’s site for a gluten free, paleo eggplant recipe, I had to share it. Our version is slightly modified, but you can see her original version here

What I love about this recipe is the almond meal which helps the eggplant maintain a crunchy, fried, aspect to it, even though it’s baked.  So you can enjoy this guilt-free, delish version of a formerly unhealthy meal! 

Paleo “Fried” Eggplant Marinara (on a bed of greens)

Prep Time: 15 minutes

Cook Time: 30 minutes

Total Time: 30 minutes

Yield: 4 servings

Paleo “Fried” Eggplant Marinara (on a bed of greens)

Ingredients

  • 1 medium eggplant
  • 2 cups almond meal
  • 1 cup marinara sauce or fresh diced tomatoes
  • 2 eggs
  • 4 cups of greens (I used arugula)
  • 1T macadamia nut oil

Instructions

  1. Preheat oven to 400 degrees.
  2. Line two cookie sheets with parchment paper.
  3. Peel eggplant and slice into 1/4 inch rounds.
  4. Whisk eggs in a medium bowl.
  5. Place almond meal in another bowl.
  6. Dredge each eggplant round in the eggs and then coat with the almond meal on each side.
  7. Place on the parchment paper
  8. Repeat for all of the eggplant.
  9. Drizzle or mist the oil over the coated rounds.
  10. Salt and pepper lightly.
  11. Cook for 30 minutes.
  12. In the meantime, place a cup of greens on each plate.
  13. Divide the cooked eggplant among the plates.
  14. Put a 1/4 cup of marinara sauce or fresh tomatoes over the top of each serving. Enjoy!
http://inspiredeats.net/paleo-fried-eggplant-marinara-on-a-bed-of-greens/


For those of us following the Paleo or Primal Blueprint diets, pancakes are a thing of the past, right?

At least, that’s what I thought until I ran across this recipe on Mark’s Daily Apple. It’s definitely more carb-centric than much of what he suggests but as he states many times, those of us following the Primal Blueprint can allow for an indulgence now and then and still keep on track with our goals for health, wellness, weight loss, etc. That said, this is a delish and healthy indulgence and one I’m excited to make again this weekend. I hope you enjoy it too!


Paleo ‘Pancakes’

Prep Time: 10 minutes

Cook Time: 10 minutes

Total Time: 20 minutes

Yield: 4 pancakes

Paleo ‘Pancakes’

Ingredients

  • 2 bananas
  • 1 egg
  • 1-2 Tbs almond butter
  • fresh blueberries
  • 1/4 cup walnuts, chopped
  • 1 tsp. coconut oil

Instructions

  1. Mash the bananas, add the egg and mix well.
  2. Stir in the almond butter, adding more than a tablespoon if you want a more pancake-like texture.
  3. Warm the coconut oil in a pan and pour batter into small cakes.
  4. Brown on each side and serve warm topped with fresh blueberries.
  5. Enjoy!!
http://inspiredeats.net/paleo-pancakes/


Ahh, the juicy, sticky, chewy goodness of fruit rollups brings back memories of  childhood –  twisting and pulling it from my teeth after making all sorts of weird shapes with it. Now that I think about it, I’m not sure how it got that pliable quality, and its probably best I dont know!

But, since I’m living Paleo, and trying to keep my son on the Paleo track too, they aren’t something I let him enjoy. So, when I found this recipe I was excited to give it a shot for him, and excited at how simple and clever the idea is!  They take a bit of time to bake, so you’ll have to plan ahead for a time when you’ll be around for a couple hours to let them bake, but they stay good for a couple weeks so go ahead and make a big batch and keep slipping them in your kids lunch boxes and feel good about it!

(more…)

These tasty gluten and grain free chicken tenders came from a recipe I found on Marksdailyapple and are super easy to make.

They’re a great alternative for kids, and perfect to use atop a salad when you’re craving a bit of a salty/crunchy treat. Plus they’re perfect to pair with an asian-inspired or spicy-fruit dipping sauce (think mango chutney) if you want to serve them as an appetizer instead!

Enjoy 🙂