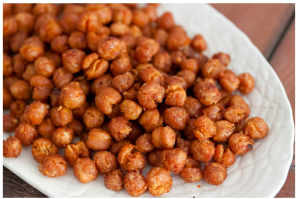
Sometimes I miss the salty crunch of chips, pretzels or crackers, so when the urge kicks in I turn to these guys; roasted, spicy chickpeas. They’re a tasty, easy to make treat and I typically have all the ingredients in the pantry. I discovered the recipe on What’s Gaby Cooking and I have to admit, I love the warm, spicy, toasty, salty combo! They make a great snack on their own, or as a side dish to your fave main course. 

All you need is 30 minutes, a can of garbanzo beans and some typical household spices. Kick up the heat for those of you with a flair for spicy. Enjoy!


Allergy-free, paleo roasted chickpeas

Prep Time: 5 minutes

Cook Time: 20 minutes

Total Time: 25 minutes

Yield: 1 yummy bowlful

Allergy-free, paleo roasted chickpeas

Ingredients

  • 1 15-oz can Garbanzo Beans
  • 1/2 tsp salt
  • 1/2 tsp garlic powder
  • 1/2 tsp red pepper flakes
  • 1/2 tsp paprika

Instructions

  1. Preheat the oven to 400 degree F.
  2. Drain and rinse the garbanzo beans in a large colander. Continue to rinse until all the foamy liquid goes away.
  3. Line the counter with a few sheets of paper towel. Place the drained garbanzo beans on top of the paper towel and let them dry for a few minutes.
  4. Once the beans are dried, place them on a parchment lined baking sheet. Drizzle with olive oil and then sprinkle on the spices. Using your hands, toss the beans around so they are all fully coated.
  5. Place the baking sheet in the oven for 20 minutes and all to roast. After 20 minutes, remove the pan from the oven and give the beans a little shake and then place back into the oven for another 20 minutes.
  6. Season with salt if needed once fully roasted and then serve.
http://inspiredeats.net/allergy-free-paleo-roasted-chickpeas/

Sweet, salty, creamy and crunchy. Too good to pass up!

I’ve mentioned how much I like this site, Against All Grain, in the past so today I’m showcasing another of her fab recipes which is perfect for summer! As someone who eats a lot of salads, I can tell you I’m excited to give this one a shot.  The idea of combining the sweet and gritty texture of watermelon with arugula and goat cheese is just too tasty to imagine. So while I head out to the store to grab some watermelon, I wanted to throw this recipe up so you can enjoy it in the meantime. 


watermelon salad with arugula, goat cheese & candied walnuts

Yield: 6 servings

Serving Size: 1 individual salad

watermelon salad with arugula, goat cheese & candied walnuts

Ingredients

  • 6 pieces of watermelon, cut to 1 inch thickness
  • 2 cups baby arugula
  • 2 tablespoons fresh mint, chopped
  • 2 teaspoons extra virgin olive oil
  • 1 teaspoon fresh lemon juice
  • pinch of salt and pepper
  • 1/4 cup crumbled goat cheese (omit Goat Cheese or sub in Vegan cheese for vegan options)
  • 1 teaspoon balsamic vinegar
  • 1/2 cup Spiced Candied Walnuts, roughly chopped

Instructions

  1. Using a large biscuit cutter, or just great circle cutting knife skills!, cut the watermelon slices into round circles. Use a knife to trim off any parts that make the circle uneven so it sits flat on a plate.
  2. In a medium bowl, toss the arugula with the mint, olive oil, lemon juice, salt, and pepper.
  3. Arrange the watermelon circles on a plate, then top each with a small handful of the arugula mixture (roughly 1/3 cup each).
  4. Sprinkle each salad with goat cheese and the chopped walnuts, then drizzle the balsamic vinegar over the tops.
  5. Enjoy!

Notes

* If you’re serving to a larger crowd, or don’t want to take the time to cut the watermelon into rounds, you can use a melon baller to create cute balls or just simply cut the watermelon into chunks and pile it all into a salad bowl.

http://inspiredeats.net/watermelon-salad-with-arugula-goat-cheese-candied-walnuts/


Are you gluten-free, but still want to enjoy some of the sinfully delicious recipes you were used to, such as P.F Chang’s Mongolian Beef?  Well now you can! Here’s a recipe for PF Chang’s Mongolian Beef (one of my hubby’s faves) as prepared gluten free. 

Note the nutritional content on the recipe below and keep in mind this is a splurge/indulgence 🙂 

Enjoy!


P.f. Chang’s Mongolian Beef (Gluten Free)

Prep Time: 30 minutes

Cook Time: 30 minutes

Yield: 2

Serving Size: 1 (492 g)

Calories per serving: 848.2

Fat per serving: 23.4

Ingredients

  • 2 teaspoons vegetable oil
  • 1/2 teaspoon ginger , minced
  • 1 tablespoon garlic , chopped
  • 1/2 cup tamari soy sauce (aka gluten-free soy sauce. DO NOT use regular soy sauce)
  • 1/2 cup water
  • 3/4 cup dark brown sugar
  • vegetable oil , for frying (about 1 cup)
  • 1 lb flank steak
  • 1/4 cup cornstarch (verify it has no wheat or wheat flour)
  • 2 large green onions

Instructions

  1. Make the sauce by heating 2 tsp of vegetable oil in a medium saucepan over med/low heat.
  2. Don't get the oil too hot.
  3. Add ginger and garlic to the pan and quickly add the soy sauce and water before the garlic scorches.
  4. Dissolve the brown sugar in the sauce, then raise the heat to about medium and boil the sauce for 2-3 minutes or until the sauce thickens.
  5. Remove it from the heat.
  6. Slice the flank steak against the grain into 1/4" thick bite-size slices.
  7. Tilt the blade of your knife at about a forty five degree angle to the top of the steak so that you get wider cuts.
  8. Dip the steak pieces into the cornstarch to apply a very thin dusting to both sides of each piece of beef.
  9. Let the beef sit for about 10 minutes so that the cornstarch sticks.
  10. As the beef sits, heat up one cup of oil in a wok (you may also use a skillet for this step as long as the beef will be mostly covered with oil).
  11. Heat the oil over medium heat until it's nice and hot, but not smoking.
  12. Add the beef to the oil and sauté for just two minutes, or until the beef just begins to darken on the edges.
  13. You don't need a thorough cooking here since the beef is going to go back on the heat later.
  14. Stir the meat around a little so that it cooks evenly.
  15. After a couple minutes, use a large slotted spoon to take the meat out and onto paper towels, then pour the oil out of the wok or skillet.
  16. Put the pan back over the heat, dump the meat back into it and simmer for one minute.
  17. Add the sauce, cook for one minute while stirring, then add all the green onions.
  18. Cook for one more minute, then remove the beef and onions with tongs or a slotted spoon to a serving plate.
  19. Leave the excess sauce behind in the pan.

Notes

Amount Per Serving % Daily Value Calories 848.2 Calories from Fat 211 24% Total Fat 23.4 g 36% Saturated Fat 8.4 g 42% Cholesterol 154.2 mg 51% Sodium 4255.9 mg 177% Total Carbohydrate 103.1 g 34% Dietary Fiber 1.5 g 6% Sugars 81.9 g 327% Protein 56.7 g 113

http://inspiredeats.net/p-f-changs-mongolian-beef-gluten-free/

Easy breezy, this brisket recipe is a no-brainer for an easy and delish dinner option.

With the use of Braggs Aminos, its not only paleo but gluten-free friendly too! So grab the crockpot, set it on simmer and come home to a house filled with the amazing aroma of brisket.  We enjoy this with mashed cauliflower, but asparagus, broccoli or any other fave veggie are great as well. 


(more…)

Today I stumbled upon a new site and found some delish looking baked zucchini chips which are a perfect solution for a no-grain diet. The site isn’t focused on allergy-free eating, but if you find yourself wanting some inspiration for yummy looking baked goods, it seems like Maggie of Vittles an Bits will be a good source I’ve copied her comments about the recipe below for reference and note that she’s very responsive if you have any questions so feel free to post them on her site.

For reference here is her link

Baked Zucchini Chips

Ingredients

  • 1 zucchini
  • Cooking spray
  • Seasoned salt, or other seasoning(s) of your choice

Instructions

  1. Preheat oven to 225 degrees Fahrenheit. Line a baking sheet with parchment paper or nonstick foil, and spray with canola oil. Set aside.
  2. Slice zucchini into thin medallions, about the thickness of a quarter. (You can either use a knife & a very steady hand, or a mandoline slicer.)
  3. Lay out slices on prepared baking sheet, and spray tops lightly with additional cooking spray. Sprinkle with seasonings of your choice. (A note on seasoning, however – use LESS than what seems appropriate. These shrink considerably in the oven, and if you use too much it gets very concentrated. It’s better to end up underseasoning and add more later.)
  4. Place in preheated oven and bake 45 minutes. Rotate baking sheet (don’t flip the chips though), and bake an additional 30-50 minutes, until chips are browned and crisped to your liking. These are best eaten within a couple hours of removing from the oven, as they start to get chewy if left out. One zucchini makes one serving (1/4 C. – 1/3 C. of chips depending on the size of your squash).
http://inspiredeats.net/baked-zucchini-chips/
 

From Maggie: 

To me, these chips taste kinda like thin & crispy pumpkin seeds.  (I guess that shouldn’t be too much of a surprise since they are relatives in the squash family).  Much lighter, but the taste is similar.

And the seasoning possibilities are endless – you can tailor them to your liking.  Garlic, paprika, chili powder… use your imagination!  I went with a basic Seasoned Salt and they came out great.  But whatever you choose, just make sure you go easy on the seasonings, and only use a little bit – these do shrink a lot in the oven, so what looks like a reasonable amount on the raw veggies could turn out to be way too much!

(more…)

I completely admire people who can cook; while I LOVE food, I sadly didn’t inherit the cooking gene so I default to recipes by those uber-talented folks I’ve discovered online. So today I share with you a recipe I ran across from a fellow Paleo girl. It looks divine and I’m hoping I can convince my hubby to make it for us this weekend 🙂 Thanks to Girlmeetspaleo for this inspired dish!

(more…)

For today’s Inspired Bite I chose a recipe from The Mayo Clinic which happens to include the nutritional details as well. While I don’t typically concentrate on those aspects as I feel like they work themselves out when you’re following a Paleo or Primal Blueprint lifestyle, I went ahead and included them in case it’s helpful. I love salmon and find it to be an easy, super healthy option packed with healthy Omegas, and while this recipe calls for lemon, I often pair mine with a mango or other fruit based side to complement the salty/fishy flavor.

 Enjoy!

(more…)

For those of you following a gluten free and paleo diet, the occasional comfort food meal is encouraged, so long as you stick to the healthy Paleo guidelines. So when I saw this post on Cavegirl Cuisine’s site for a gluten free, paleo eggplant recipe, I had to share it. Our version is slightly modified, but you can see her original version here

What I love about this recipe is the almond meal which helps the eggplant maintain a crunchy, fried, aspect to it, even though it’s baked.  So you can enjoy this guilt-free, delish version of a formerly unhealthy meal! 

Paleo “Fried” Eggplant Marinara (on a bed of greens)

Prep Time: 15 minutes

Cook Time: 30 minutes

Total Time: 30 minutes

Yield: 4 servings

Paleo “Fried” Eggplant Marinara (on a bed of greens)

Ingredients

  • 1 medium eggplant
  • 2 cups almond meal
  • 1 cup marinara sauce or fresh diced tomatoes
  • 2 eggs
  • 4 cups of greens (I used arugula)
  • 1T macadamia nut oil

Instructions

  1. Preheat oven to 400 degrees.
  2. Line two cookie sheets with parchment paper.
  3. Peel eggplant and slice into 1/4 inch rounds.
  4. Whisk eggs in a medium bowl.
  5. Place almond meal in another bowl.
  6. Dredge each eggplant round in the eggs and then coat with the almond meal on each side.
  7. Place on the parchment paper
  8. Repeat for all of the eggplant.
  9. Drizzle or mist the oil over the coated rounds.
  10. Salt and pepper lightly.
  11. Cook for 30 minutes.
  12. In the meantime, place a cup of greens on each plate.
  13. Divide the cooked eggplant among the plates.
  14. Put a 1/4 cup of marinara sauce or fresh tomatoes over the top of each serving. Enjoy!
http://inspiredeats.net/paleo-fried-eggplant-marinara-on-a-bed-of-greens/


For those of us following the Paleo or Primal Blueprint diets, pancakes are a thing of the past, right?

At least, that’s what I thought until I ran across this recipe on Mark’s Daily Apple. It’s definitely more carb-centric than much of what he suggests but as he states many times, those of us following the Primal Blueprint can allow for an indulgence now and then and still keep on track with our goals for health, wellness, weight loss, etc. That said, this is a delish and healthy indulgence and one I’m excited to make again this weekend. I hope you enjoy it too!


Paleo ‘Pancakes’

Prep Time: 10 minutes

Cook Time: 10 minutes

Total Time: 20 minutes

Yield: 4 pancakes

Paleo ‘Pancakes’

Ingredients

  • 2 bananas
  • 1 egg
  • 1-2 Tbs almond butter
  • fresh blueberries
  • 1/4 cup walnuts, chopped
  • 1 tsp. coconut oil

Instructions

  1. Mash the bananas, add the egg and mix well.
  2. Stir in the almond butter, adding more than a tablespoon if you want a more pancake-like texture.
  3. Warm the coconut oil in a pan and pour batter into small cakes.
  4. Brown on each side and serve warm topped with fresh blueberries.
  5. Enjoy!!
http://inspiredeats.net/paleo-pancakes/


Ahh, the juicy, sticky, chewy goodness of fruit rollups brings back memories of  childhood –  twisting and pulling it from my teeth after making all sorts of weird shapes with it. Now that I think about it, I’m not sure how it got that pliable quality, and its probably best I dont know!

But, since I’m living Paleo, and trying to keep my son on the Paleo track too, they aren’t something I let him enjoy. So, when I found this recipe I was excited to give it a shot for him, and excited at how simple and clever the idea is!  They take a bit of time to bake, so you’ll have to plan ahead for a time when you’ll be around for a couple hours to let them bake, but they stay good for a couple weeks so go ahead and make a big batch and keep slipping them in your kids lunch boxes and feel good about it!

(more…)

Sometimes it’s hard to keep things interesting at breakfast when you’re on a gluten-free and paleo diet. I’ve read of some great paleo options that aren’t gluten-free so I can’t try them, so when I ran across this recipe today I fell in love with it – too bad it’s mid afternoon and I’ll have to wait till tomorrow morning to try them!


  (more…)