For those of us living a gluten-free life, mastering a tasty, fluffy bread can be a bit challenging. Thanks to one of my fave cookbooks, The Gluten Free Almond Flour Cookbook, this delish bread is a great base for sandwiches, hors d’oeuvres or as a simple tasty snack. You can cut this loaf into thin slices, spread on a baking sheet and toast in the oven at 350° F for 5 to 10 minutes. Spread the resulting cracker with hummus, goat cheese, feta, or drizzled with your favorite olive oil.

The possibilities are endless!


(more…)

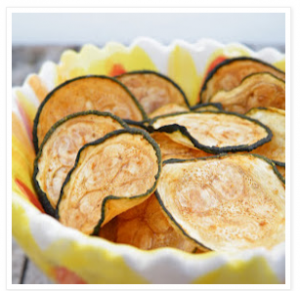
Today I stumbled upon a new site and found some delish looking baked zucchini chips which are a perfect solution for a no-grain diet. The site isn’t focused on allergy-free eating, but if you find yourself wanting some inspiration for yummy looking baked goods, it seems like Maggie of Vittles an Bits will be a good source I’ve copied her comments about the recipe below for reference and note that she’s very responsive if you have any questions so feel free to post them on her site.

For reference here is her link

Baked Zucchini Chips

Ingredients

  • 1 zucchini
  • Cooking spray
  • Seasoned salt, or other seasoning(s) of your choice

Instructions

  1. Preheat oven to 225 degrees Fahrenheit. Line a baking sheet with parchment paper or nonstick foil, and spray with canola oil. Set aside.
  2. Slice zucchini into thin medallions, about the thickness of a quarter. (You can either use a knife & a very steady hand, or a mandoline slicer.)
  3. Lay out slices on prepared baking sheet, and spray tops lightly with additional cooking spray. Sprinkle with seasonings of your choice. (A note on seasoning, however – use LESS than what seems appropriate. These shrink considerably in the oven, and if you use too much it gets very concentrated. It’s better to end up underseasoning and add more later.)
  4. Place in preheated oven and bake 45 minutes. Rotate baking sheet (don’t flip the chips though), and bake an additional 30-50 minutes, until chips are browned and crisped to your liking. These are best eaten within a couple hours of removing from the oven, as they start to get chewy if left out. One zucchini makes one serving (1/4 C. – 1/3 C. of chips depending on the size of your squash).
http://inspiredeats.net/baked-zucchini-chips/
 

From Maggie: 

To me, these chips taste kinda like thin & crispy pumpkin seeds.  (I guess that shouldn’t be too much of a surprise since they are relatives in the squash family).  Much lighter, but the taste is similar.

And the seasoning possibilities are endless – you can tailor them to your liking.  Garlic, paprika, chili powder… use your imagination!  I went with a basic Seasoned Salt and they came out great.  But whatever you choose, just make sure you go easy on the seasonings, and only use a little bit – these do shrink a lot in the oven, so what looks like a reasonable amount on the raw veggies could turn out to be way too much!

(more…)

While working on the recipe section tonight I was compiling some kid-friendly, gluten free lunch ideas and I ran across this one I had saved from the Washington Post some time ago. It’s a great option for a cold lunch and the plantains make for a delish and healthy addition with the black beans. Plantains have a heart healthy combo of nutrients, including vitamin B6, vitamin C, potassium and fiber. They also contain resistant starch, which acts as a prebiotic, selectively nourishing the “good gut” bacteria that line the intestinal tract and protect against food borne illness. Yummy and good for us- yay! 🙂

(more…)

I completely admire people who can cook; while I LOVE food, I sadly didn’t inherit the cooking gene so I default to recipes by those uber-talented folks I’ve discovered online. So today I share with you a recipe I ran across from a fellow Paleo girl. It looks divine and I’m hoping I can convince my hubby to make it for us this weekend 🙂 Thanks to Girlmeetspaleo for this inspired dish!

(more…)

For those of you following a gluten free and paleo diet, the occasional comfort food meal is encouraged, so long as you stick to the healthy Paleo guidelines. So when I saw this post on Cavegirl Cuisine’s site for a gluten free, paleo eggplant recipe, I had to share it. Our version is slightly modified, but you can see her original version here

What I love about this recipe is the almond meal which helps the eggplant maintain a crunchy, fried, aspect to it, even though it’s baked.  So you can enjoy this guilt-free, delish version of a formerly unhealthy meal! 

Paleo “Fried” Eggplant Marinara (on a bed of greens)

Prep Time: 15 minutes

Cook Time: 30 minutes

Total Time: 30 minutes

Yield: 4 servings

Paleo “Fried” Eggplant Marinara (on a bed of greens)

Ingredients

  • 1 medium eggplant
  • 2 cups almond meal
  • 1 cup marinara sauce or fresh diced tomatoes
  • 2 eggs
  • 4 cups of greens (I used arugula)
  • 1T macadamia nut oil

Instructions

  1. Preheat oven to 400 degrees.
  2. Line two cookie sheets with parchment paper.
  3. Peel eggplant and slice into 1/4 inch rounds.
  4. Whisk eggs in a medium bowl.
  5. Place almond meal in another bowl.
  6. Dredge each eggplant round in the eggs and then coat with the almond meal on each side.
  7. Place on the parchment paper
  8. Repeat for all of the eggplant.
  9. Drizzle or mist the oil over the coated rounds.
  10. Salt and pepper lightly.
  11. Cook for 30 minutes.
  12. In the meantime, place a cup of greens on each plate.
  13. Divide the cooked eggplant among the plates.
  14. Put a 1/4 cup of marinara sauce or fresh tomatoes over the top of each serving. Enjoy!
http://inspiredeats.net/paleo-fried-eggplant-marinara-on-a-bed-of-greens/


For those of us following the Paleo or Primal Blueprint diets, pancakes are a thing of the past, right?

At least, that’s what I thought until I ran across this recipe on Mark’s Daily Apple. It’s definitely more carb-centric than much of what he suggests but as he states many times, those of us following the Primal Blueprint can allow for an indulgence now and then and still keep on track with our goals for health, wellness, weight loss, etc. That said, this is a delish and healthy indulgence and one I’m excited to make again this weekend. I hope you enjoy it too!


Paleo ‘Pancakes’

Prep Time: 10 minutes

Cook Time: 10 minutes

Total Time: 20 minutes

Yield: 4 pancakes

Paleo ‘Pancakes’

Ingredients

  • 2 bananas
  • 1 egg
  • 1-2 Tbs almond butter
  • fresh blueberries
  • 1/4 cup walnuts, chopped
  • 1 tsp. coconut oil

Instructions

  1. Mash the bananas, add the egg and mix well.
  2. Stir in the almond butter, adding more than a tablespoon if you want a more pancake-like texture.
  3. Warm the coconut oil in a pan and pour batter into small cakes.
  4. Brown on each side and serve warm topped with fresh blueberries.
  5. Enjoy!!
http://inspiredeats.net/paleo-pancakes/


These tasty gluten and grain free chicken tenders came from a recipe I found on Marksdailyapple and are super easy to make.

They’re a great alternative for kids, and perfect to use atop a salad when you’re craving a bit of a salty/crunchy treat. Plus they’re perfect to pair with an asian-inspired or spicy-fruit dipping sauce (think mango chutney) if you want to serve them as an appetizer instead!

Enjoy 🙂


This is a quick and easy recipe for a side dish that I love to pair with meats and fish. It’s similar to the old-school wedge salads but doesn’t have all the fatty and high calorie badness from the Blue Cheese dressing, though it has the same creamy texture thanks to the avocado. And if you’re like us, you believe that most anything is made better with a touch of bacon 🙂 But for those avoiding meat, this is a great salad minus the bacon, and I’ve been told that almonds are a nice salty touch in its place. 

Super simple and delish – enjoy!

I love easy and delicious recipes, and this one doesn’t disappoint!

This Paleo Jambalaya recipe was sent to me from a friend (thanks Kristy!) who said it was delish and easy to make, and she was right. It takes about a half hour to 40 minutes to prepare, so you can be sitting down for dinner in less than an hour. Season with hot sauce to suit your tastes, and feel good about serving this to your family! 

One note – you can use mashed cauliflower in place of rice to keep it MyPaleo friendly. Enjoy!


Paleo Jambalaya

Prep Time: 20 minutes

Cook Time: 20 minutes

Total Time: 40 minutes

Yield: 4 servings

Serving Size: 8 ounces

Paleo Jambalaya

Ingredients

  • 2 tbsp. olive oil
  • 1 lb Andouille sausage
  • 2 lbs. chicken tenders, cut into chunks
  • 1 onion, chopped
  • 3 cloves garlic, minced
  • 3 celery stalks, chopped
  • 1 green bell pepper, sliced
  • 1 red bell pepper, sliced
  • 4 fresh thyme sprigs
  • 2 cups chicken broth
  • 1 cup tomato sauce
  • ¼ cup hot sauce (optional)
  • 1lb raw shrimp, peeled and deveined
  • 8 oz. okra, chopped
  • 2 tbsp. parsley, finely chopped
  • 4 green onions, chopped

Instructions

  1. In a large saucepan over high heat, brown the sausage in the olive oil.
  2. Cook for approximately 3 minutes, or until golden brown.
  3. Add the chicken to the saucepan and season with salt and pepper.
  4. Continue cooking on all sides for a few more minutes until the chicken begins to brown.
  5. Add the onion, garlic, celery, peppers and thyme to the saucepan.
  6. Mix in with the meat
  7. Continue to cook for 5 to 7 minutes and frequently stir to prevent anything from sticking to the bottom of the pan.
  8. Add the broth, tomato sauce and hot sauce.
  9. Mix well and allow it to come to a boil.
  10. Once the mixture has boiled, add the shrimp and okra.
  11. Reduce the heat and simmer covered for 5 to 7 minutes, or until shrimp is pink.
  12. Remove the jambalaya from the heat and stir in the parsley and green onions prior to serving.
http://inspiredeats.net/paleo-jambalaya/


A friend sent me this recipe from Kitchen Addiction as a great idea for a sweet/salty treat, and suggested they would make nice home-made gifts too, and I have to admit that home-made gifts have that special touch store-bought gifts can lack and I personally love a home-made gift.  You can wrap them in some cellophane and use a simple ribbon to tie them, or give them in decorative tins, but whatever you do, be sure to share these and you’ll win big points as these are DELISH! 

(more…)