I never thought I’d have a food blog – I wasn’t very impressive in the kitchen and everyone who knows me knows I much prefer to have someone else create something amazing than to try to tackle it myself. But then came 2010 and my body shut down, my brain quit working and getting out of bed became a bigger task that I could have ever imagined, and along this auto-immune journey, I’ve had to change my old ways of thinking.

I had to start preparing my own meals so I could be sure to avoid allergic foods, and control the quality of what I was eating.  I gave up most of my favorites, and hated life for a while. We discovered the gluten-free, Paleo way of life. We switched from plastic to glass, from non stick to cast iron, and I was now taking more supplements in a day than I used to take in a month. I needed to find a way to love my new (food) life.

Then one day my palette changed, and I learned to love feeling healthy and looking better.  I’m more patient now, so taking the time to prepare meals doesn’t drive me nuts like it used to. And I’m actually kind of enjoying the feeling of creating something from scratch that my guys like too.  Neither one of them is very good at sugar-coating their thoughts on my dishes, so when I do get something right I love their feedback.

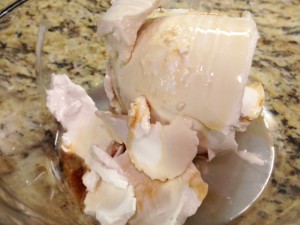
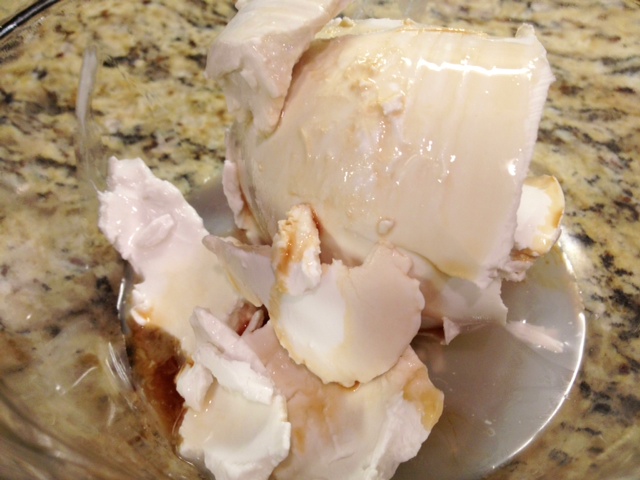
So here’s my attempt at recreating an old favorite – cool whip. It took  a few times, and I got the best version when I let the can sit opened in the fridge for 3 nights.  I made it on the 4th day, and since I used the same brand and method as I have in the past, I’m confident that was the key step. Oh, and as for the type of coconut milk, grab full fat, organic milk with only milk, water and a stabilizer like guar gum.

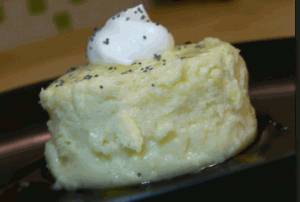
Whipped coconut milk lets me make a kick ass dessert that would rival my old fave – Cool Whip. Man, I love it when I get them right!

whipped coconut cream

Step 1: Add maple syrup and vanilla to coconut milk

whipped coconut cream

Step 2: whip the cream until fluffy (about 30 seconds)


(more…)

Got the winter blues? What better way to cheer you up then a yummy, homemade lemon tart?

Citrus usually makes us think of cool summer refreshments, but winter is actually when these vibrant fruits ripen. And I can’t think of many better ways to recall images of sunny summer days than with a refreshing lemony treat.

This light, zingy recipe uses coconut oil, coconut milk, and lots of lemon zest for a delicious gluten free, dairy free treat!  While you can use whipped cream and poppyseeds for toppings, another variation would be to whip up some cold coconut cream. Check out this recipe from Ohsheglows to see how quick and easy whipped coconut cream can be!


Gluten Free, Dairy Free Lemon Curd Tarts

Gluten Free, Dairy Free Lemon Curd Tarts

Ingredients

  • 4 TBSP coconut oil
  • ¾ c sugar
  • 5 eggs, separated
  • ¾ c coconut milk
  • ¼ c gluten free flour
  • ½ c fresh lemon juice
  • 1 TBSP lemon zest
  • ½ c lemon juice
  • 1 vanilla bean, split and seeds scraped
  • ¼ c sugar
  • Whipped cream (or non-dairy replacement) and poppyseeds for topping, if desired

Instructions

  1. Preheat oven to 350.
  2. Prepare 10 small ramekins with nonstick spray and place in a large glass pan to prepare for a water bath. Heat water in a tea kettle or pot.
  3. Beat the egg whites until stiff peaks form. Set aside.
  4. Beat together the oil and sugar. Beat in egg yolks one at a time. Add flour, mixing well. Add lemon juice and beat until combined. Fold in egg whites.
  5. Pour batter into prepared ramekins and place glass pan in oven.
  6. Pour hot water in the pan until it is about halfway up the sides of the ramekins.
  7. Bake 20 minutes until just set.
  8. Meanwhile, combine lemon zest, lemon juice, sugar and vanilla bean.
  9. Bring to a boil until sugar is dissolved, about three minutes.
  10. Cool tarts on a wire rack then transfer to fridge to chill completely before cooling.

Notes

Adapted from Food and Wine

http://inspiredeats.net/gluten-free-dairy-free-lemon-curd-tarts/


Thanks to Ashley Blake for this tasty little treat; Ashley not only loves to whip up healthy and delish foods at home,she is also one of the owners of Bona Dea, an Austin-based Gluten-free Flour company.

 
(more…)

This is a great gluten-free, dairy-free sweet casserole option for the holidays!

Using almonds and chia seeds rather than grains, and coconut milk and oil in place of dairy-based ingredients, this is an allergy-free friendly recipe that you can add to your holiday list with confidence that it will satisfy the pickiest (and allergy-free) palette. Since it’s rich in sugar, I don’t recommend this one on a regular basis but it’s a great option for that special menu night.

The original post can be seen here, and the author was happy to let us share it with you.

Enjoy!


Pumpkin Crunch Casserole or Breakfast Pudding

Prep Time: 45 minutes

Total Time: 45 minutes

Yield: 6 servings

Pumpkin Crunch Casserole or Breakfast Pudding

Ingredients

  • 2 tablespoons chia seeds
  • 6 tablespoons water
  • coconut oil
  • 15 ounces pumpkin puree
  • 1 tablespoon pumpkin pie spice
  • 6 tablespoons sugar
  • stevia, to taste
  • 1 teaspoon vanilla
  • 2/3 cup ground almonds (preferably already toasted)
  • 2 teaspoons ground cinnamon
  • 3 tablespoons coconut cream concentrate, melted
  • 2/3 cup coconut milk*

Instructions

  1. Preheat oven to 350 degrees F.
  2. Soak chia seeds in water for about 15 minutes, stirring occasionally.
  3. Use coconut oil to coat the inside of 6 8-ounce ramekins.
  4. In medium bowl mix soaked chia seeds, pumpkin puree, pumpkin pie spice, sugar, and vanilla.
  5. Take a tiny taste and add stevia if you want a little more sweetness.
  6. After everything is well incorporated, divide pumpkin mixture evenly among the 6 ramekins.
  7. In small bowl mix ground almonds, cinnamon and coconut cream concentrate.
  8. Sprinkle evenly over the pumpkin mix.
  9. Bake for 25 minutes at 350 using a water bath method.
  10. When almonds are starting to brown, remove from oven and pour coconut milk over top.
  11. Serve warm or cold.
  12. * For the freshest coconut milk make homemade coconut milk.

Notes

Recipe submitted by Joanne, Delmar, DE to Tropical Traditions Shared with permission from Tropical Traditions.

http://inspiredeats.net/gluten-free-dairy-free-pumpkin-crunch-casserole/

(more…)

Gluten free, Dairy free & Paleo friendly Granola bars – life is good again!

As a mom of a third grader, I’m often on the hunt for quick, grab-n-go foods that I can pack in my bag or send in his lunchbox. And as someone who lives a Paleo life, coupled with a handful of other food restrictions that many of the Paleo approved convenience bars contain, I’ve had to discover recipes I can make myself.  While I love the convenience of healthy, gluten-free friendly bars such as Larabars, Thunderbird Energetica, Kind Bars, etc. I’m not able to eat most of them. The biggest culprit for me in the handy grab-n-go bars is almonds, and I have to admit that of all the foods I’m currently reacting to, my two hardest to avoid are garlic and almonds. I’ve grown used to cutting out gluten and dairy, but almonds and garlic were pretty regular staples in my diet.

So in a quest to find a yummy (and Gluten-free, Paleo approved) recipe to replace the Larabars of my past, I ran across these dark chocolate peanut butter “granola” bars created by Danielle, of Against All Grain. If you don’t know about Danielle, or her never-ending quest to bring us healthy, delicious and grain free foods, you should. She’s dedicated to the grain-free cause, and has helped thousands of families learn how to live grain-free while still enjoying themselves.

So, check out her recipe here and if you’re looking for a similar recipe that uses Coconut Oil, be sure to check out these Coconut Oil Chocolate Almond Bars or these Frozen Coconut Oil Chocolate Banana Bites which we make every week.

In Danielle’s words, ‘they’re a great energy booster when you’re hitting that wall in the middle of the day, especially for those of us that are anemic. They’re also full of calories, so be careful!’

For the full ingredients list and recipe instructions, head on over to Danielle’s site here. She not only lists the steps for us, but shows pictures along the way so you can prep these tasty little guys with confidence!


Comment below once you try these!

These little guys look perfect for Halloween!

I just saw these on Against All Grain, a fantastic blog by a woman named Danielle who is truly, incredibly talented! She has made it her mission to make living free of grains not only manageable, but delicious as well! So while these little truffles are a bit more of an undertaking than the coconut, chocolate vegan bites which we make weekly here, they are certainly worth sharing!

Here’s a picture from her site of the end product, and you can link to her site here for the recipe!