When you’re gluten-free, dairy-free and rarely eat meat, there are many things you can miss. Last night while hosting a happy hour at our office I watched as colleagues and guests enjoyed soft, warm salty pretzels dipped in spicy mustard or beer cheese sauce and washed it down with a slightly hoppy, Octoberfest beer. Next to that selection was a platter filled with pastries, loaded with creams, cheese and chocolate and topped off with powdered sugar.
For a brief moment I pictured myself thrown onto that table and devouring each and every last bite of those platters of heaven. Can’t you see it? The crazed gluten-free girl face planted on the table, devouring pretzels and pastries, head tilted back while I poured beer down my mouth. Quite the image.
Fun as that may be, I was pulled back to reality and sipped a glass of wine while I mingled with the guests who were completely unaware that I had just contemplated a gluten-fueled moment of crazy. Such is the life of a gluten-free girl with a vivid imagination.
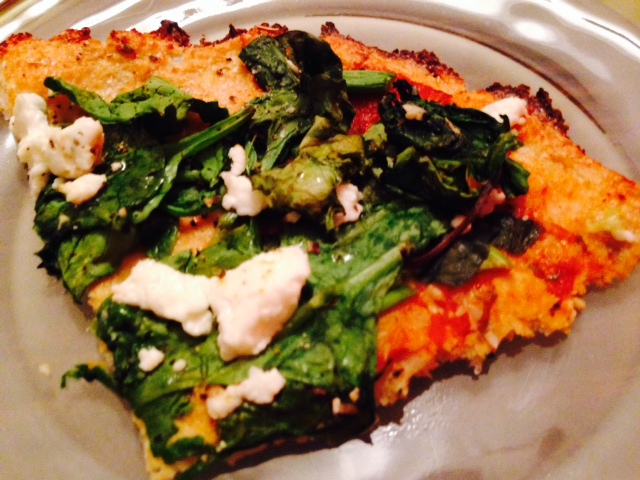
So how do I satisfy those intense cravings? No, it’s not with cauliflower crust pizza dough, though it’s a fun and yummy way to pretend you’re enjoying pizza of your past. So while this recipe won’t be nearly as satisfying a big ole greasy slice of pizza would be, it helps keep the cravings at bay. What I love about this one is that it not only helps you get in a healthy dose of cauliflower, but you can actually pick up these slices. Delicate though they are, they’ll withstand some hearty toppings so go ahead and pile them on. Just be prepared to use a fork if you go too heavy on them.
ps – share your pics with us on instagram: #caulipizza @happybellybox and be entered for a chance to win a free happybelly box!

Cauliflower Pizza Crust:
4 cups raw cauliflower rice (about one medium head)
1 egg, beaten
1/3 cup soft goat cheese (chevre)
1 teaspoon oregano
S + P to taste
1. Preheat your oven to 400F.
2. To make the cauliflower rice, pulse batches of raw cauliflower florets in a food processor until a rice-like texture is reached.

3. Fill a large pot with about an inch of water, and bring it to a boil. Add the “rice” and cover; let it cook for about 4-5 minutes. Drain into a strainer.
* SECRET: Once you’ve strained the rice, transfer it to a clean, thin dishtowel. Wrap up the steamed rice in the dishtowel, twist it up, then SQUEEZE all the excess moisture out. It’s similar to using a cheesecloth if you’ve ever made nut milks or cheeses. This will leave you with a nice and dry pizza crust!
4. In a large bowl mix the strained ‘rice’, beaten egg, goat cheese and spices. Don’t be afraid to use your hands! Remember, this won’t resemble a traditional pizza dough, but will hold together once baked.
5. Press the dough onto a baking sheet lined with parchment paper to prevent sticking. Keep the dough about ⅓” thick and make the edges a little higher for the “crust”.

6. Bake for 35-40 minutes (note: the crust should be firm and golden brown when finished).

7. Next add your favorites toppings such as sauce, cheese, spinach, dried meats, etc.
8. Return the pizza to the 400F oven and bake an additional 5-10 minutes until the cheese is hot and bubbly.
9. Slice and serve immediately. Enjoy!

